Takes about |
Offline |
macOS and Windows |
Step 1: Download UKISS Hub
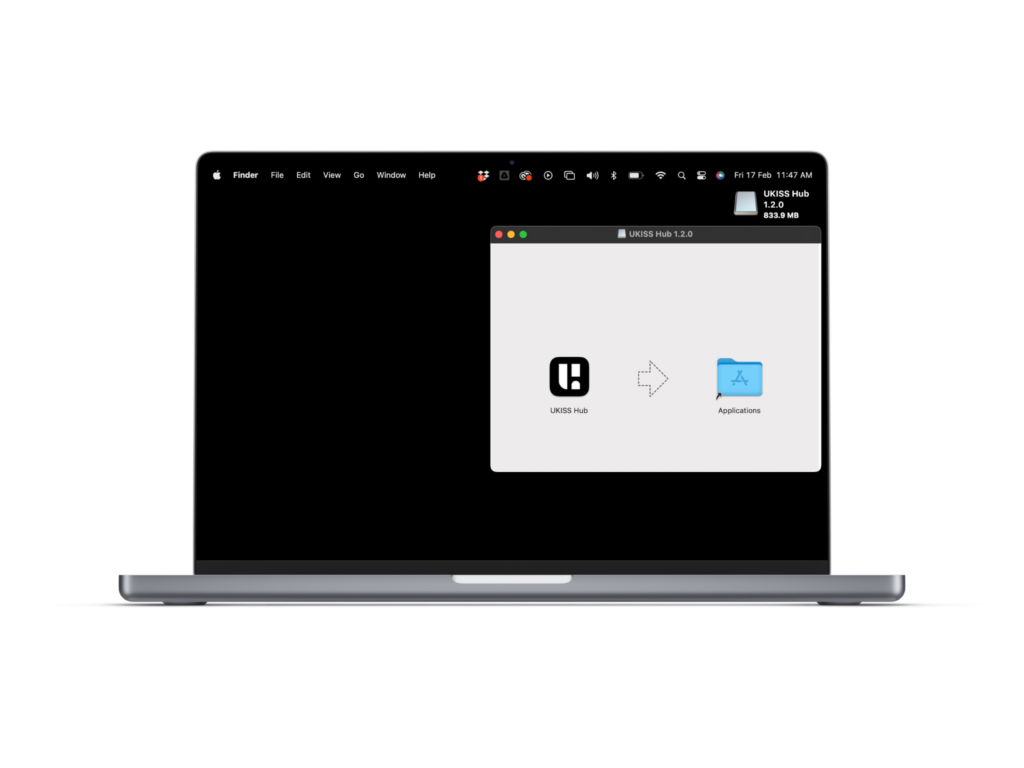
Download and install UKISS Hub on your computer.
Step 2: Launch UKISS Hub
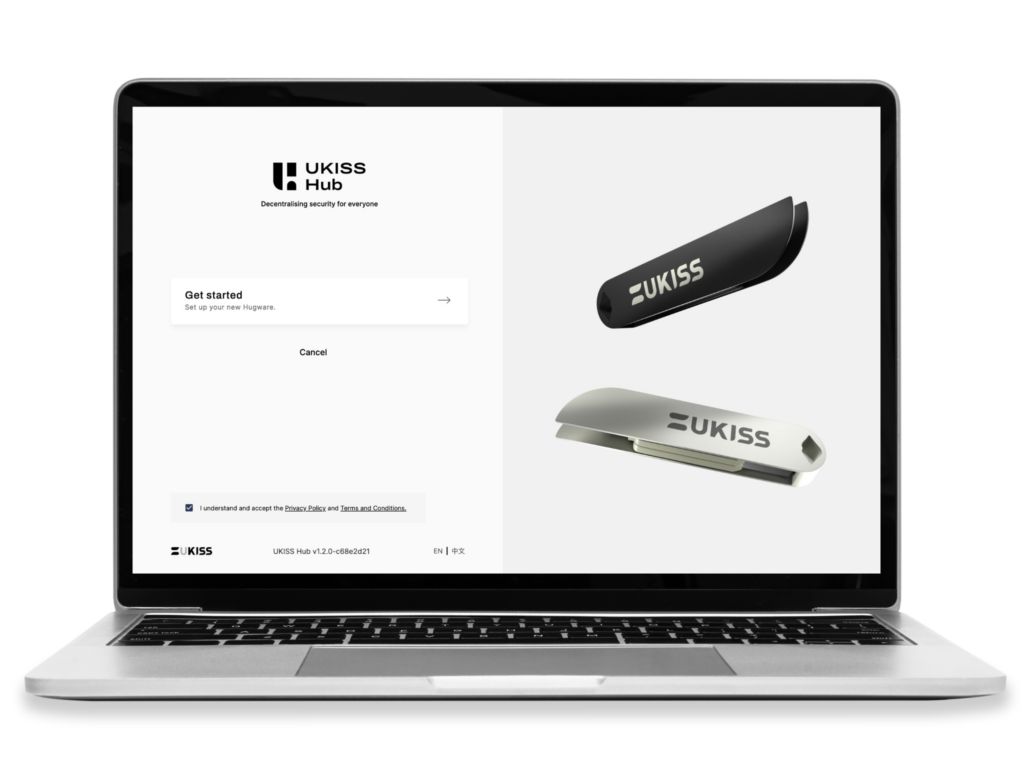
Launch UKISS Hub on your computer and check that you have arrived at the Get started page. If you do not see this page, go to the left menu and click ![]() .
.
Accept the Privacy Policy and Terms and Conditions by clicking the checkbox. After that, click the Get started button.
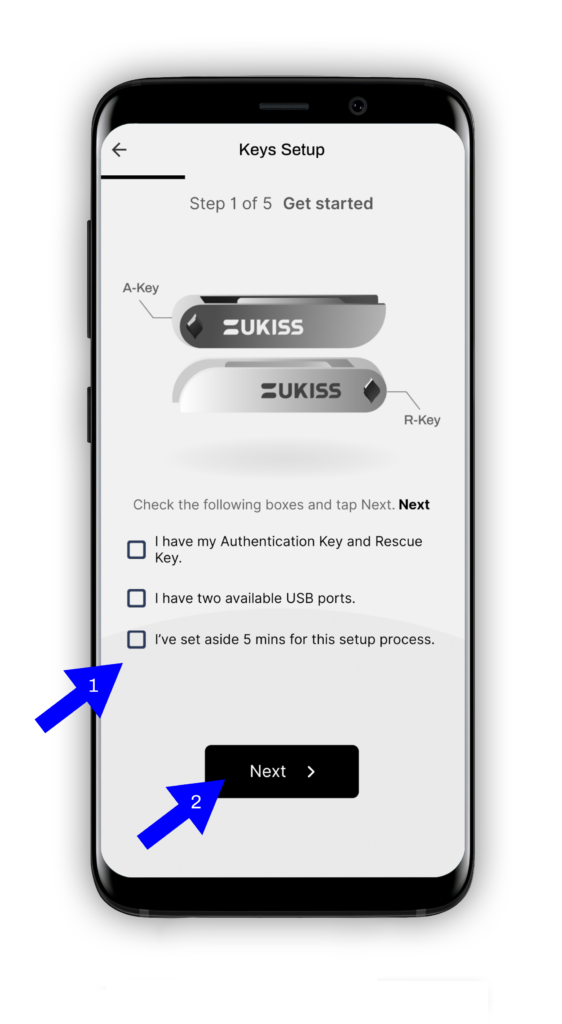
Step 3: Standby
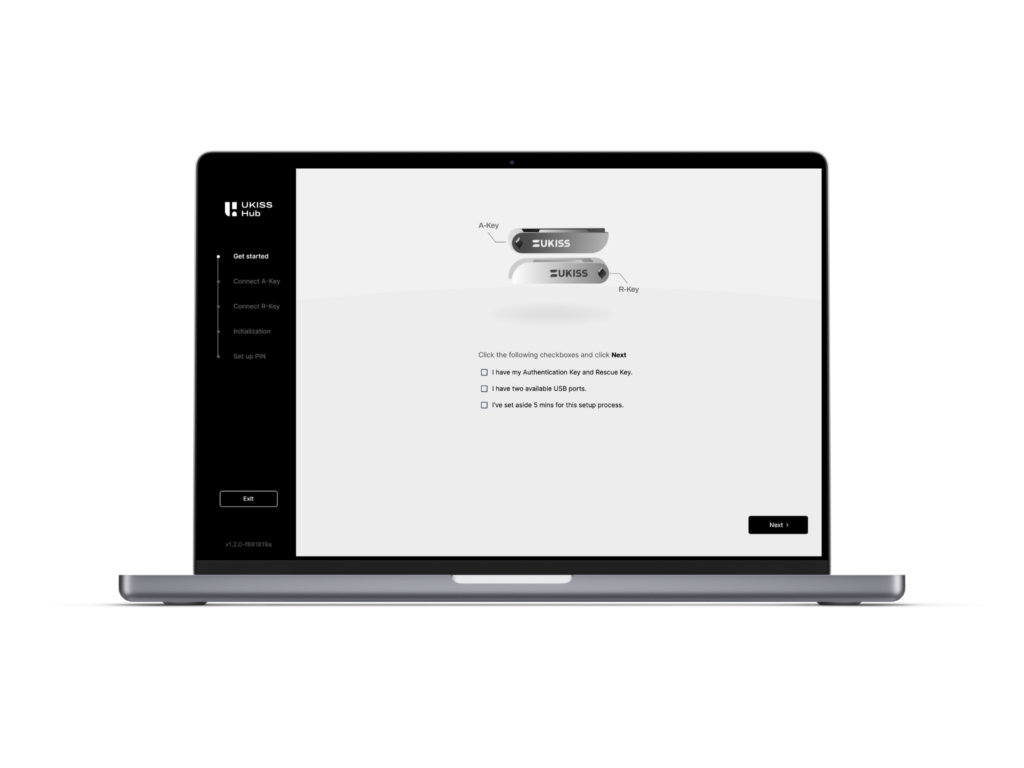
You have arrived at the start of the Hugware setup process. Click the three checkboxes to confirm that you have:
After clicking the three checkboxes, click Next.
Step 4: Connect A-Key
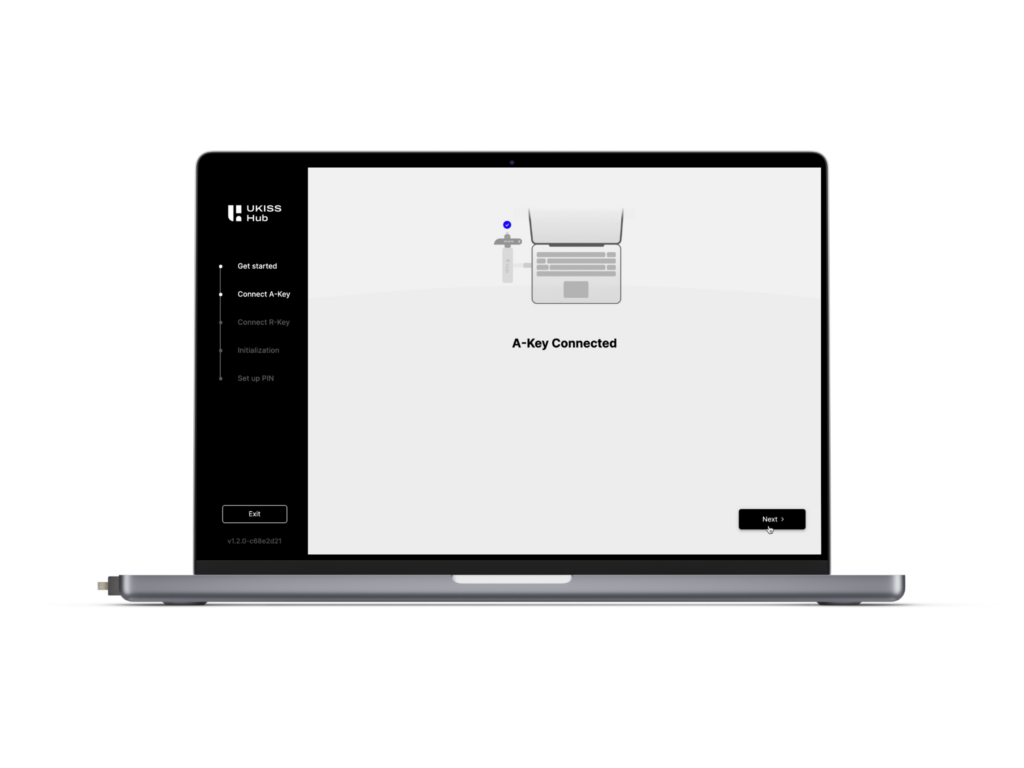
Connect the Authentication Key to your computer and wait for UKISS Hub to detect it.
If you are using an external USB hub, please connect it to your computer. Then, connect the Authentication Key to the USB hub.
Once UKISS Hub has detected your Authentication Key, click Next.
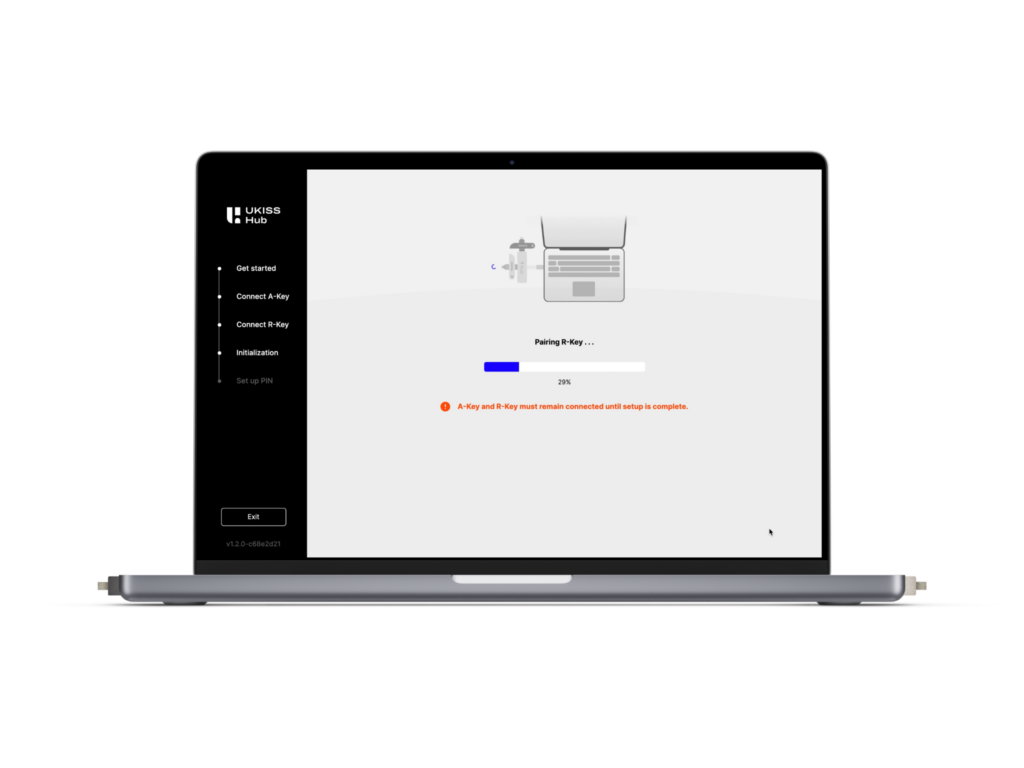
Step 5: Connect R-Key

With the A-Key still connected, connect the Rescue Key to your computer and wait for UKISS Hub to detect.
Once UKISS Hub has detected your Rescue Key, click Next.
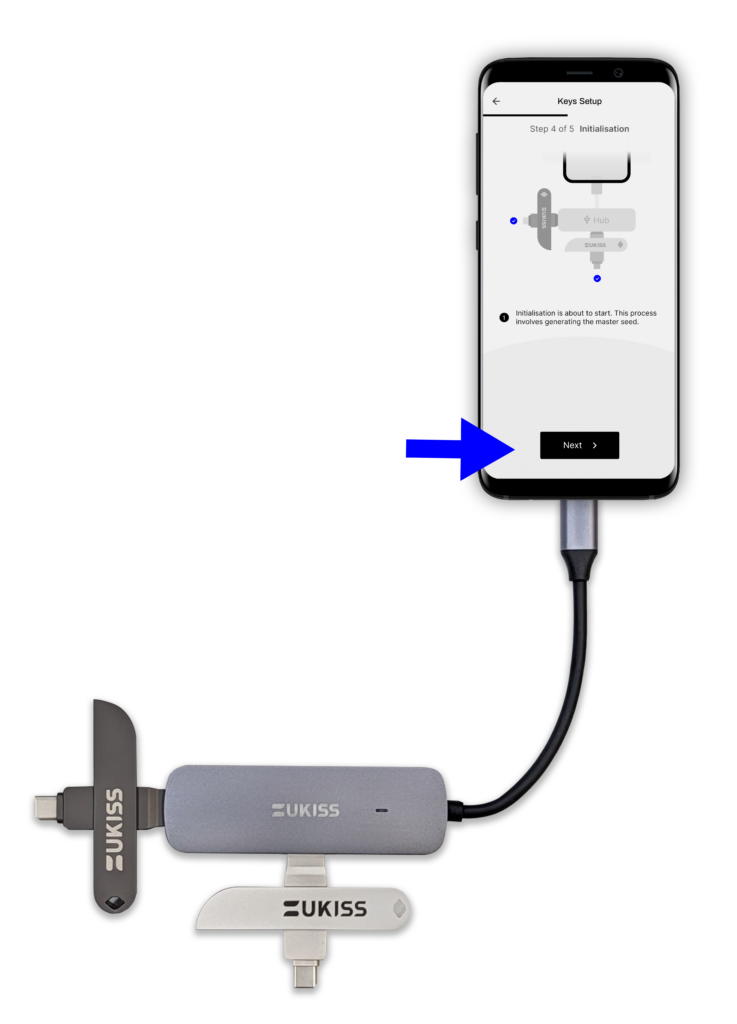
Step 6: Initialisation
You will arrive at a page that says initialisation is about to start. Click Next when you’re ready. Wait for initialisation and pairing to complete.
Do not remove the Authentication Key and the Rescue Key until setup is complete.
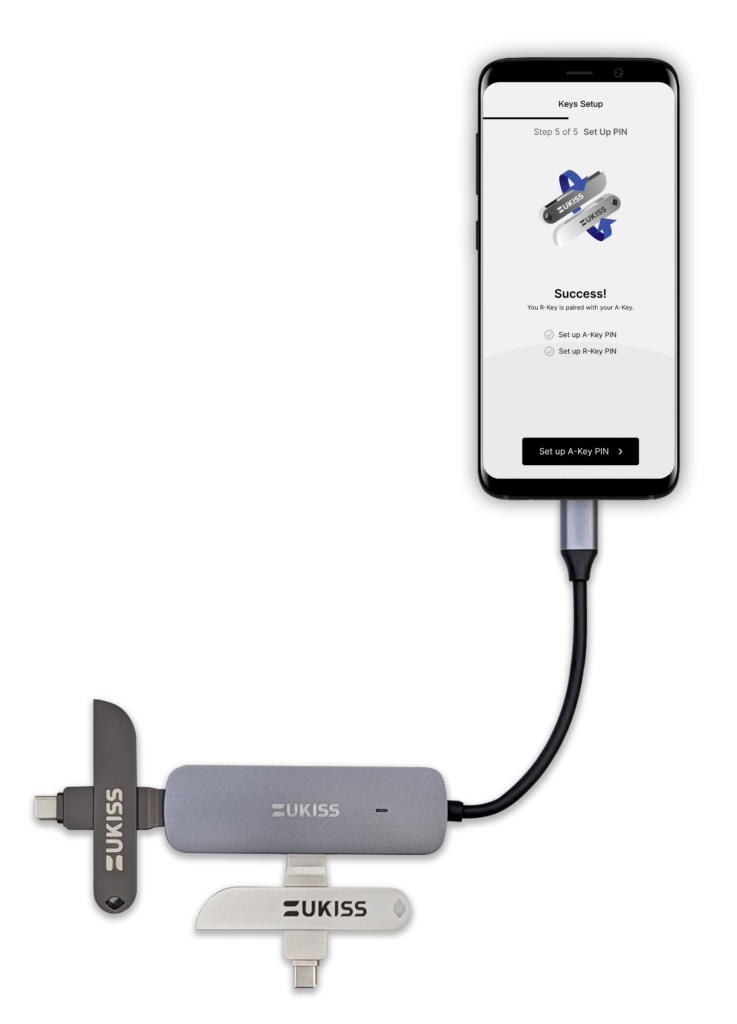
Step 7: PIN setup
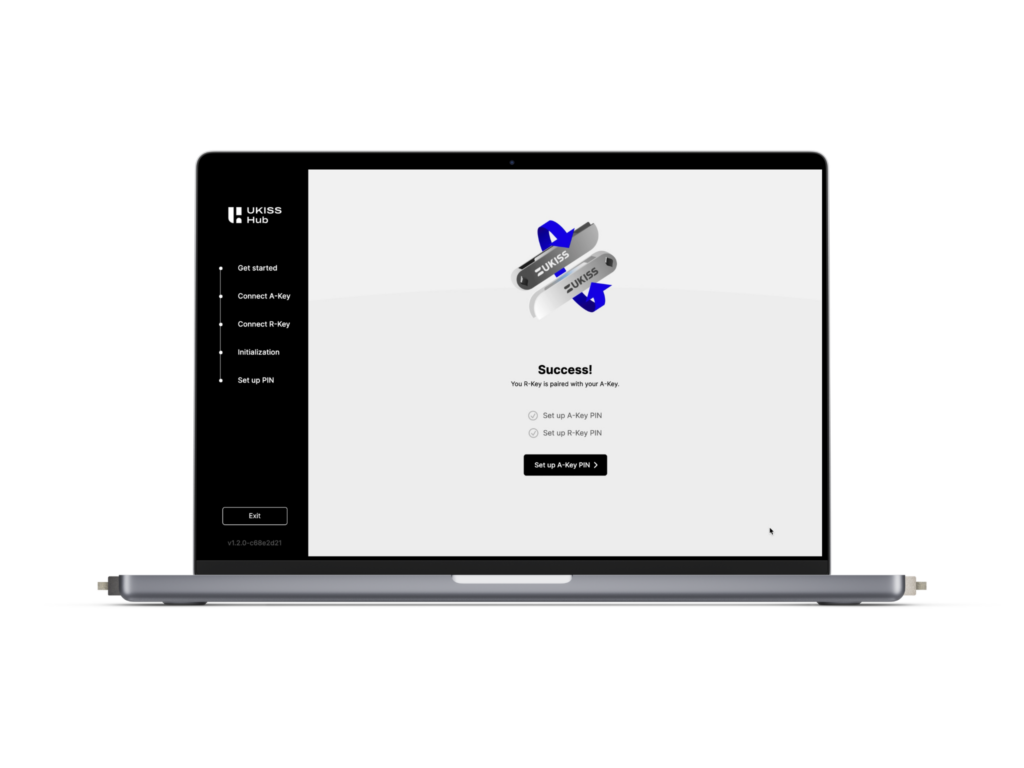
Once setup is complete, you will arrive at the success page. Next, you will need to create a PIN for your Hugware. Begin this process by clicking ![]() .
.
After setting up a PIN for your A-Key, create a PIN for your R-Key by clicking ![]() .
.
 You must remember your Rescue Key’s PIN in order to use it as your Authentication Key’s 2FA device. If you forget, you may reset your Rescue Key’s PIN with your Authentication Key, provided that you still remember the PIN to your Authentication Key. UKISS Technology cannot recover lost PINs due to the nature of Hugware’s decentralised security system.
Step 8: Complete
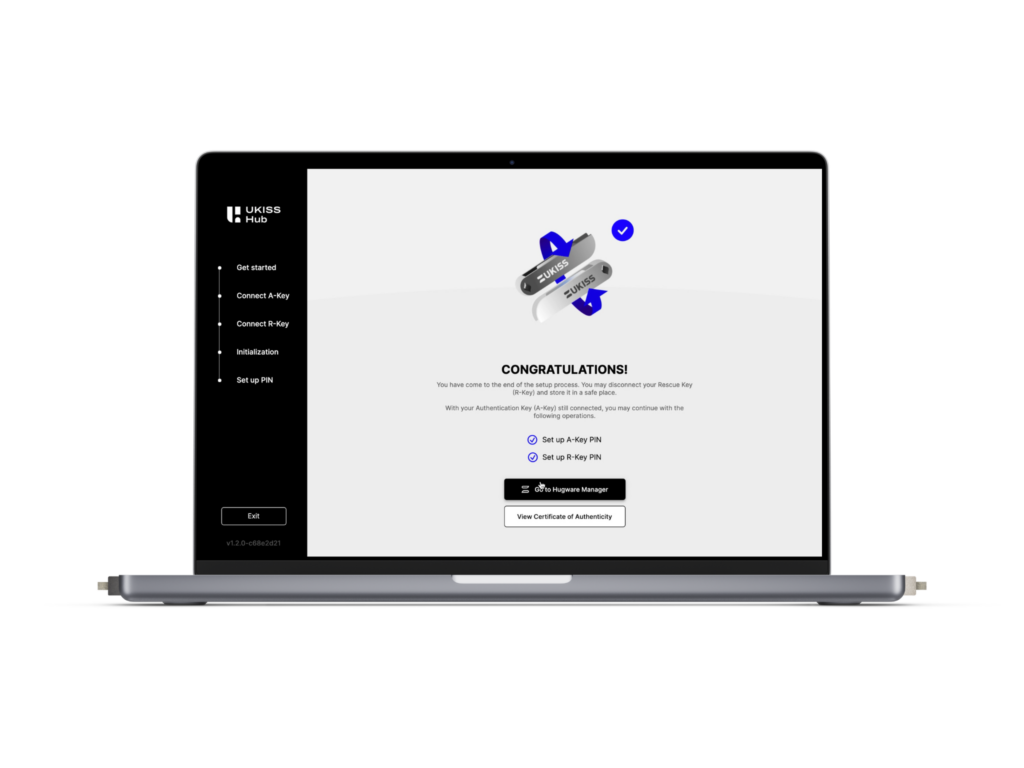
Congratulations, you have come to the end of the setup process. Please keep your Hugware safe.
Takes about |
Offline |
Android -only |
Step 1: Download and install UKISS Hub from the Google Play Store
You need internet connection to download the app.
![]()
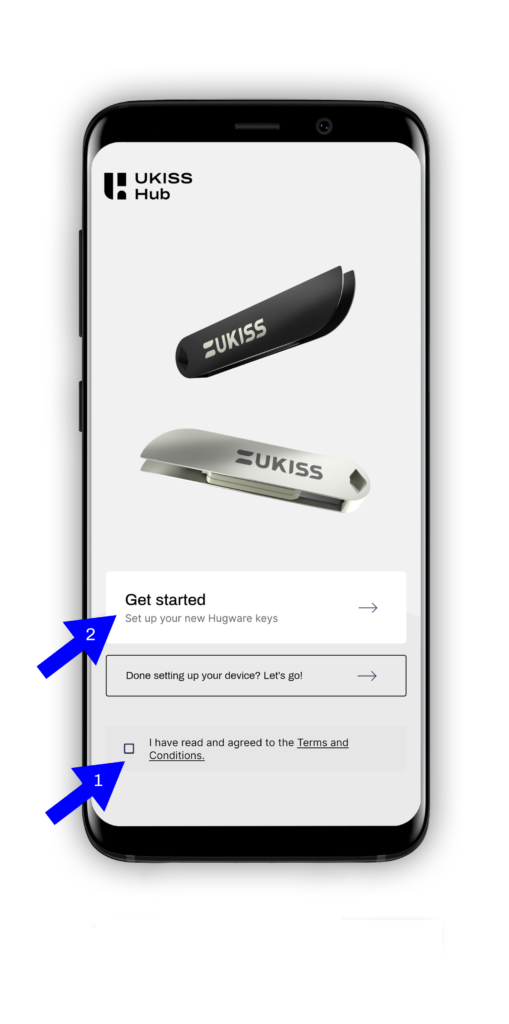
Step 2: Launch UKISS Hub on your mobile device
Once you have launched UKISS Hub on your mobile device, you will arrive at the Get Started page of the app. Check the box to confirm that you have read the Terms and Conditions and then click the Get Started button.
Step 3: Check the three boxes
Check the boxes to confirm that you have the following:
Once you have checked the three boxes, tap Next.
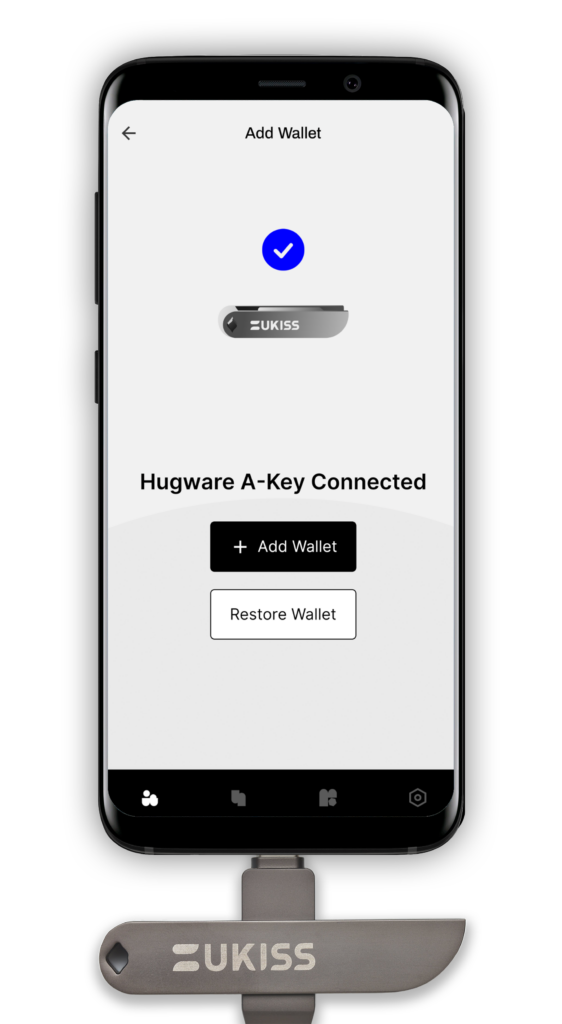
Step 4: Connect Authentication Key
Connect the USB hub to your mobile device if you haven’t done so. Then, connect the Authentication Key to this USB hub and wait for the app to detect it. Once you see a message that says “A-Key Connected,” tap Next.
![]()
Step 5: Connect Rescue Key
Connect the Rescue Key to the USB hub and wait for the app to detect it. Once you see the message, “R-Key Connected,” tap Next.
![]()
Step 6: Initialisation
The app will tell you that initialisation is about to start. When you’re ready, tap Next.
Step 7: Wait for initialisation to complete
The Authentication Key and Rescue Key must remain connected until setup is complete. Initialisation is complete once all four ticks appear on the screen to indicate the following:

Step 8: PIN setup
The app will ask you to set a PIN for your Authentication Key and Rescue Key, respectively. Set a strong numeric or alphanumeric PIN that is 6- to 15-characters long.
⚠️UKISS Hub requires you to enter your PIN when sending assets, creating accounts, resetting the PIN of the paired Key, viewing certificate of authenticity, and renaming wallets, Keys and accounts.
⚠️You must remember at least one of your PINs (either A-Key’s PIN or R-Key’s PIN). UKISS Technology cannot recover lost PINs due to Hugware’s decentralised security system.
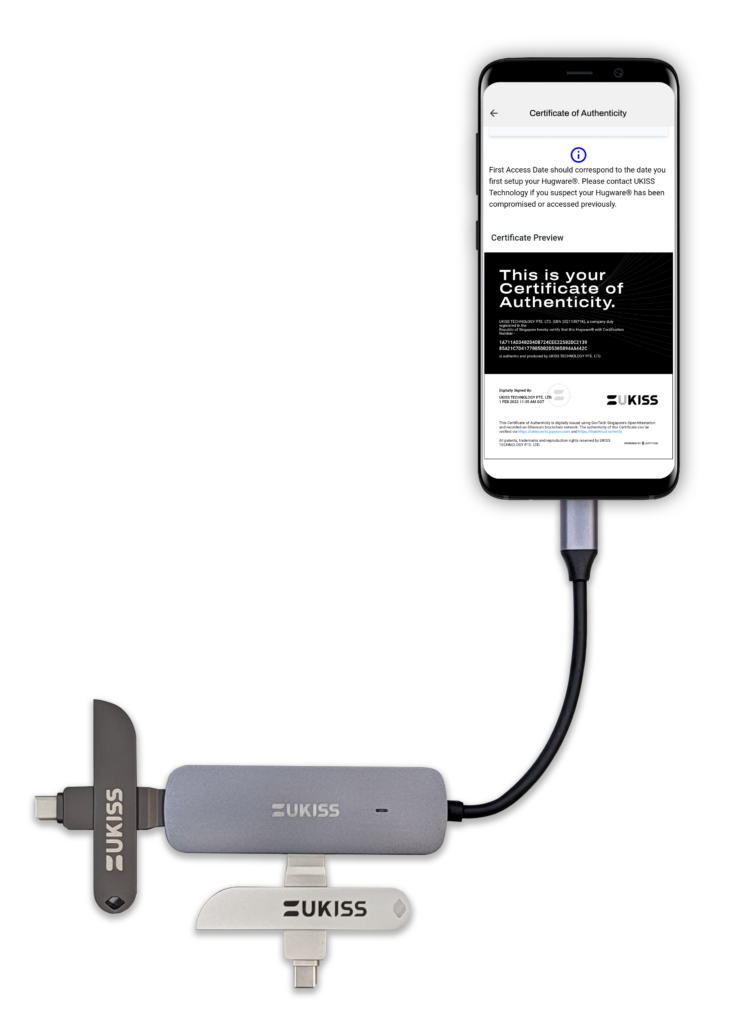
Step 9: Verify authenticity
Verify the authenticity of your Authentication Key/Rescue Key by clicking “View Certificate of Authenticity.” This certificate lets you confirm that your Keys were certified authentic by UKISS Technology. For more on this certification, go to UKISSCerts.
Complete
Congratulations! You have successfully completed the setup process. Next, you will need to set up accounts on UKISS Wallet to start securing your assets.
< 1 hour |
Online process |
Android, macOS & Windows |
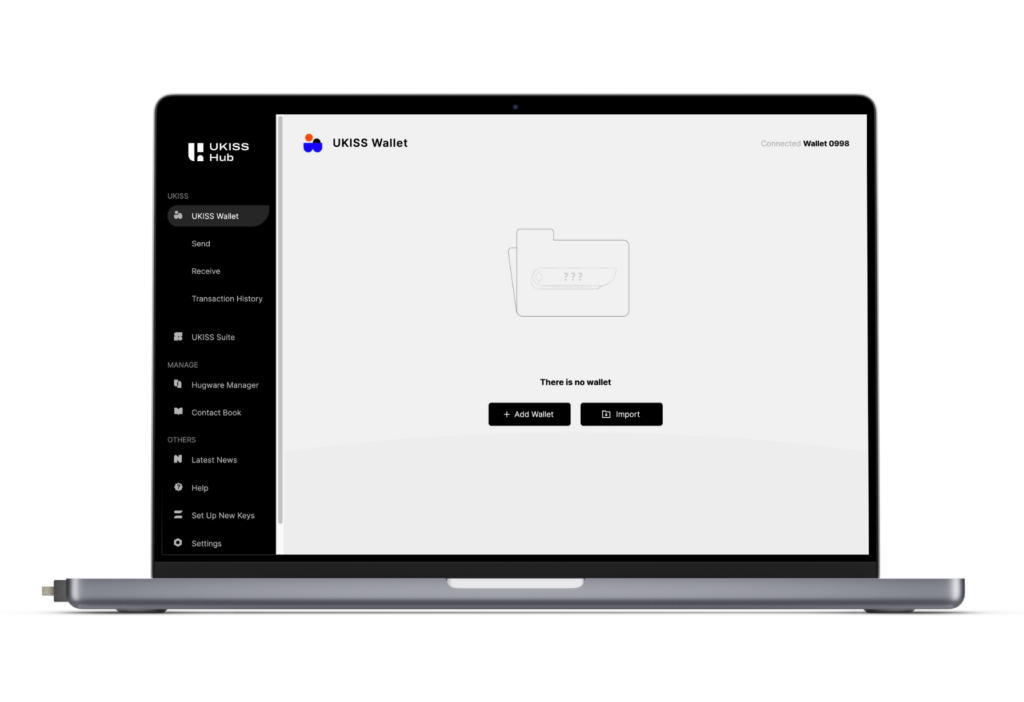
Step 1: Create/Restore Wallet
Launch UKISS Hub on your desktop or mobile device, connect your Authentication Key if you haven’t done so, and tap on the UKISS Wallet icon. To create a new wallet, tap or click on Add Wallet. To retrieve wallet data, tap or click on Restore Wallet. To import your wallet, click on Import Wallet (this feature is only available on UKISS Hub desktop).
On desktop, you will be prompted to set your wallet visibility setting. Selecting Locked ensures that your wallet cannot be viewed without connecting your Hugware A-Key or R-Key. Selecting Unlocked means your wallet can be viewed without the Hugware A-Key or R-Key.
 |  |
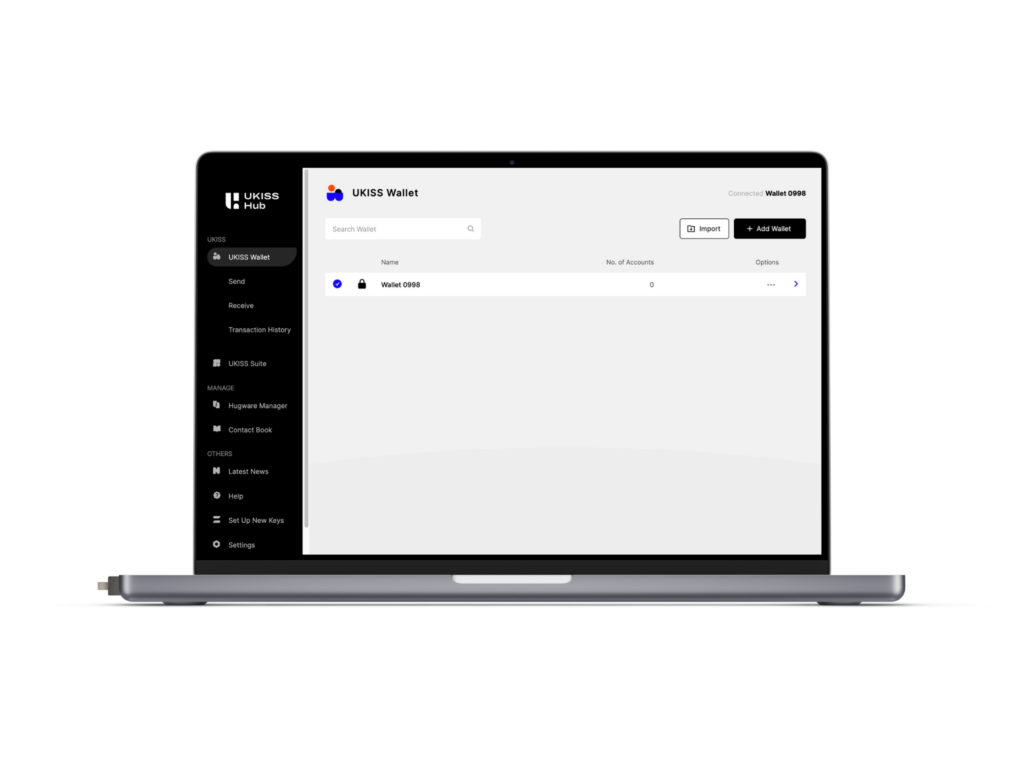
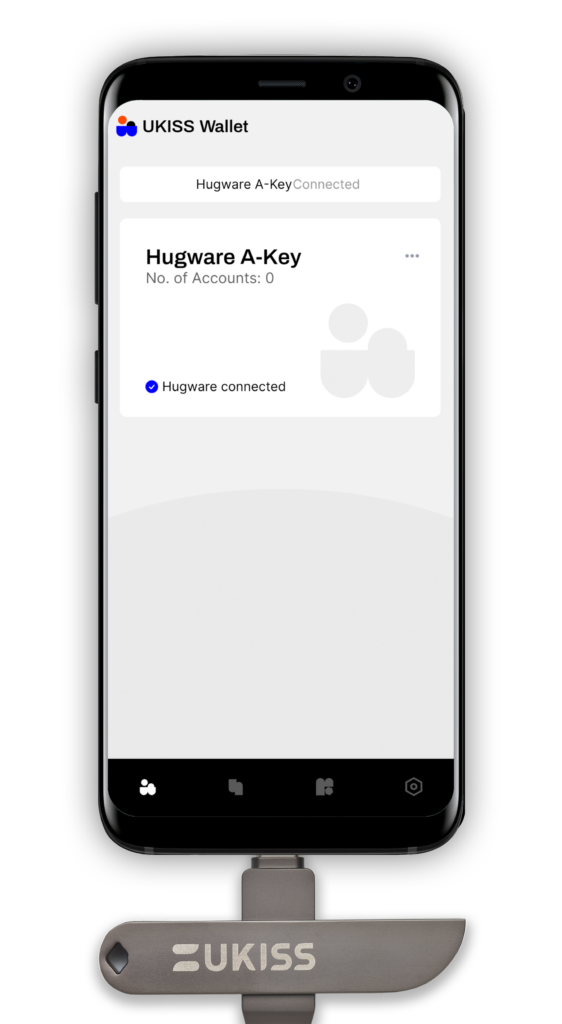
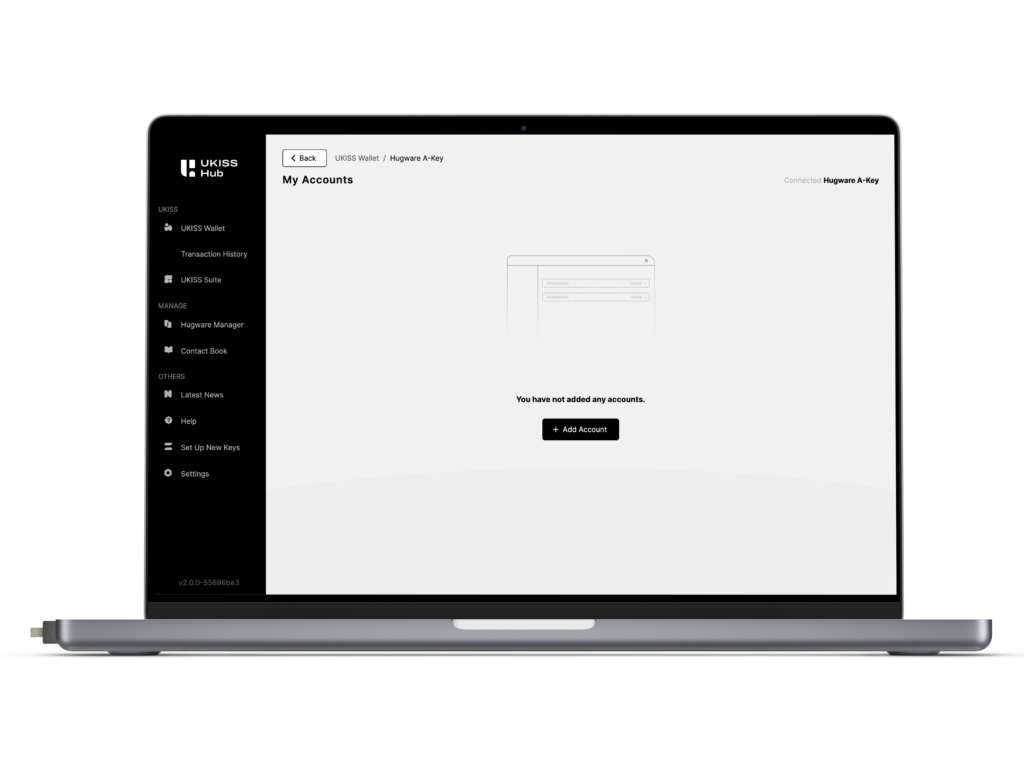
Step 2: Create account
After creating a wallet, you should be able to see your wallet on the app. Tap anywhere within the box indicating your wallet to go to the Accounts page.
 |  |
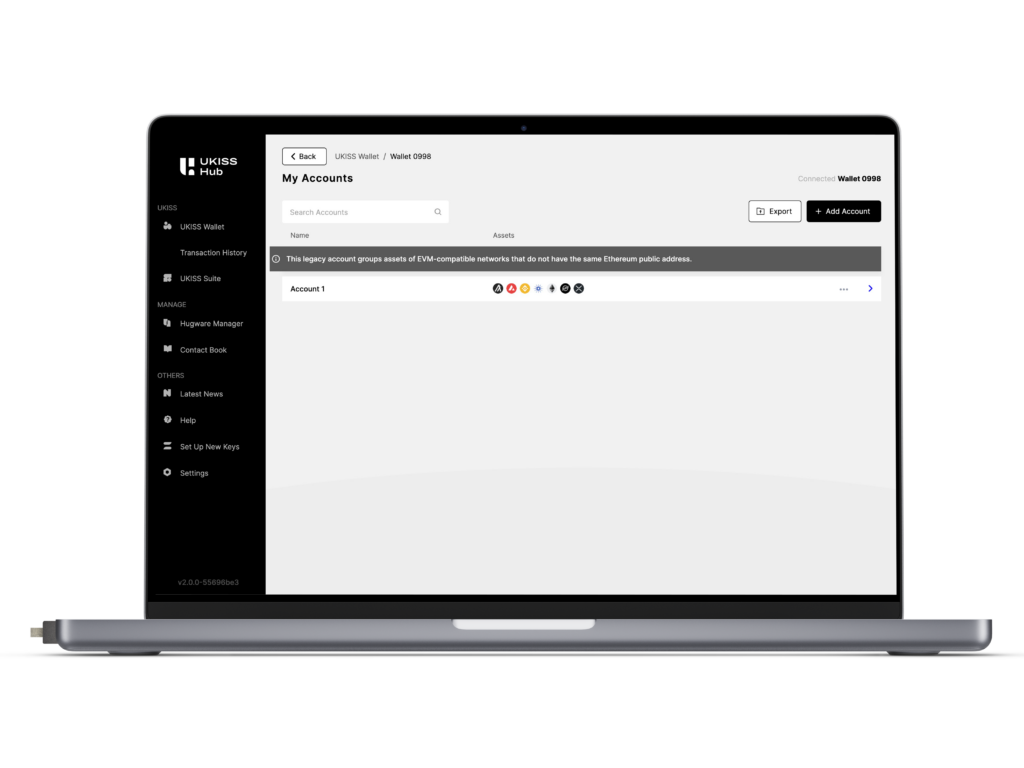
Step 3: Create account
On the Accounts page, tap on “Add Account,” give your account a name, and tap OK.
 |  |
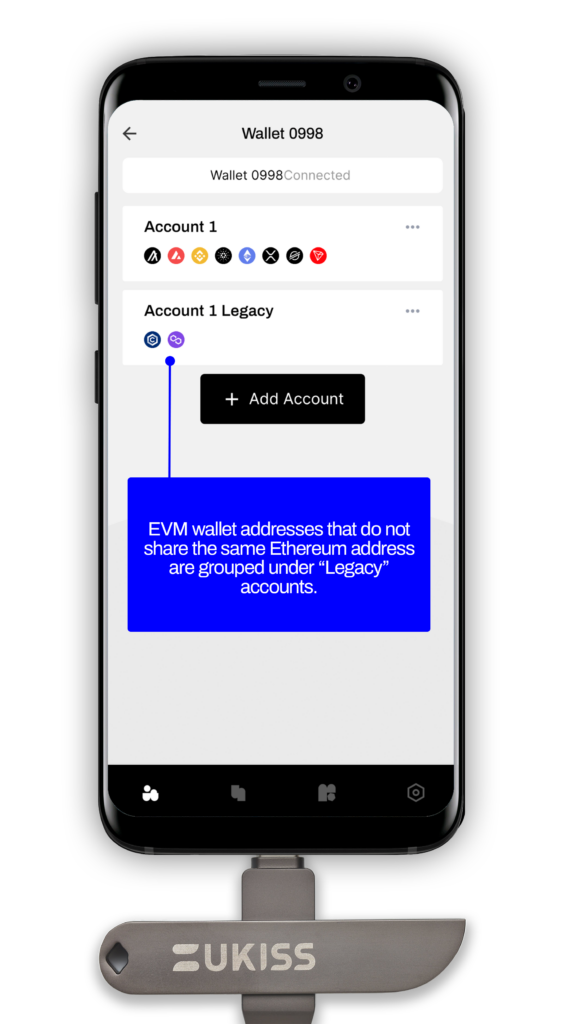
If you have restored your wallet, you will find your assets grouped in a single account, named “Account 1.” Assets of EVM-compatible networks that do not share the same Ethereum address will be grouped under “Account 1 Legacy.”
 |  |
< 1 hour |
Online process |
Android, macOS & Windows |
Follow the steps below to deposit assets to UKISS Wallet.
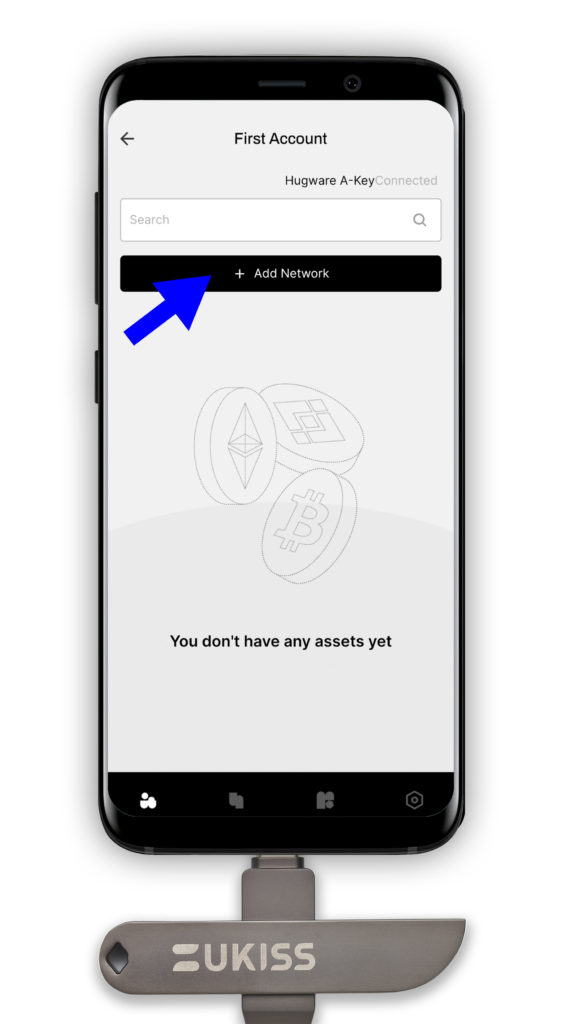
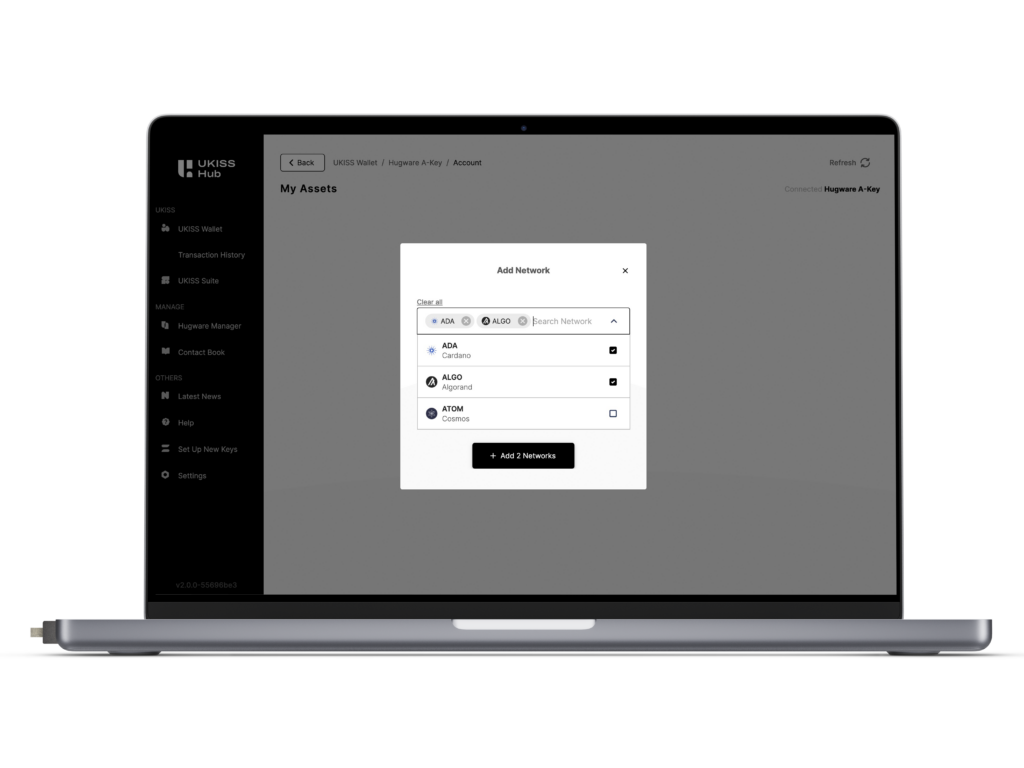
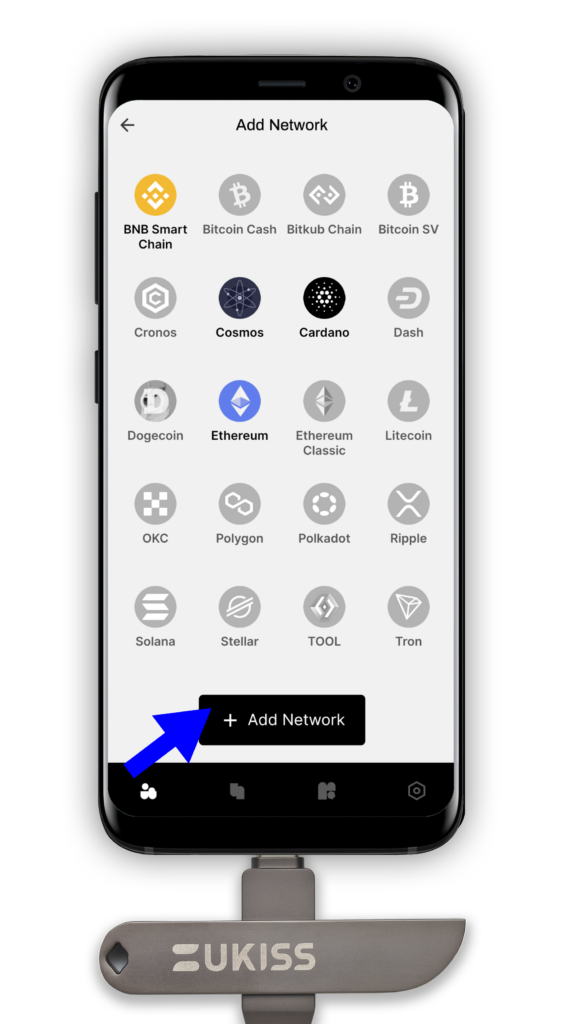
Step 1: Add Network
To deposit assets to your UKISS Wallet address, you must first generate a wallet address. Connect your Authentication Key if you haven’t done so and go to your Accounts page. If you have not created an account, refer to instructions for “Wallet Setup.”
On the Accounts page, tap or click on “Add Network” to select the networks that you are transferring your assets on. Then, tap or click on “Add Network” again. If you’re unsure of which networks to pick, check your external wallet or exchange wallet where your assets are currently stored. The network details are usually available when you’re withdrawing your assets.
(⚠️You must select the correct networks or risk losing your assets.)
 |  |
 |  |
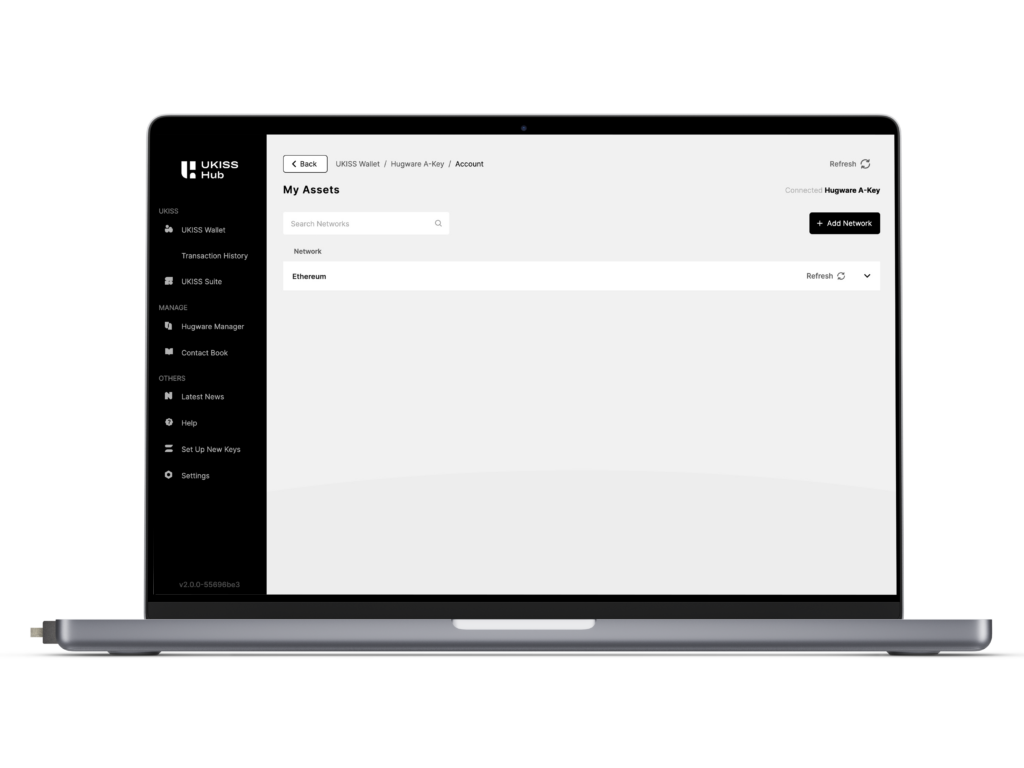
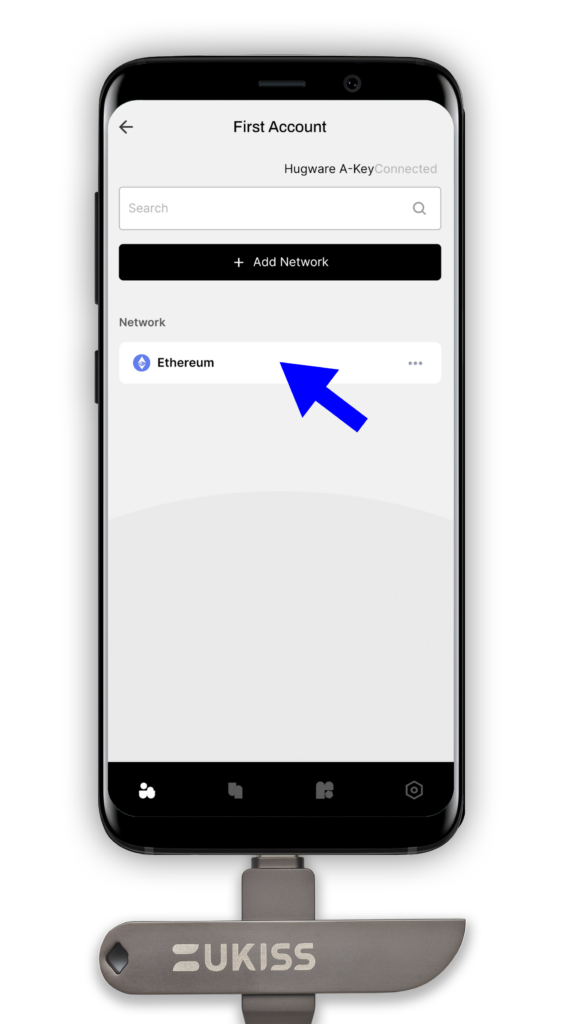
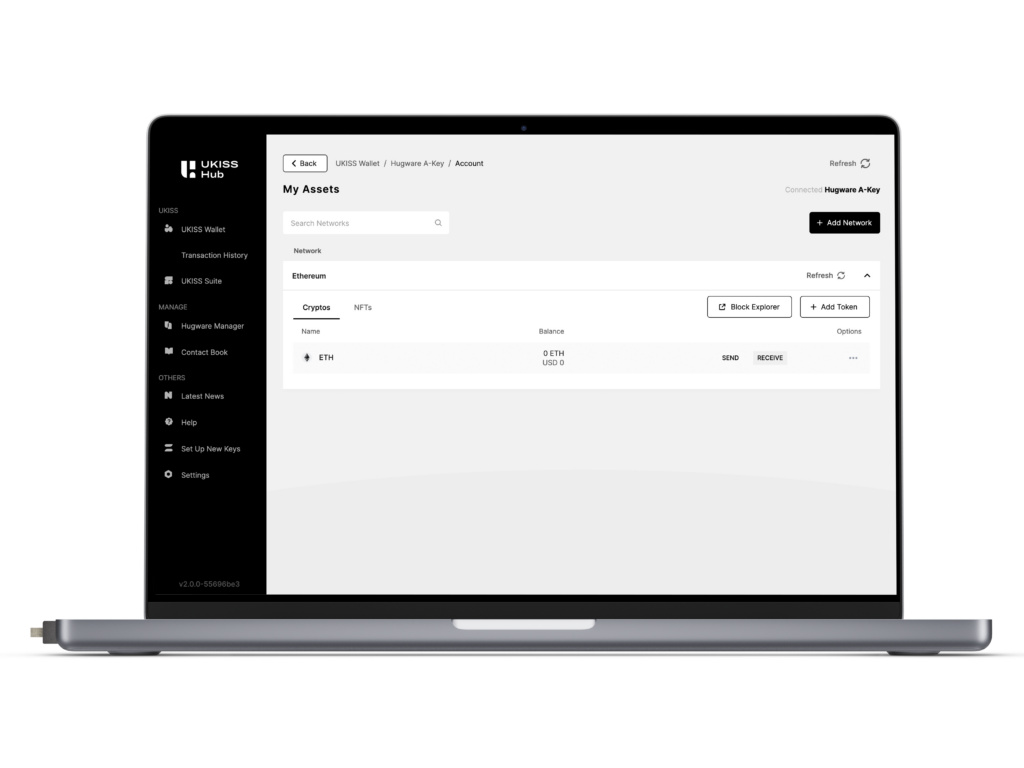
Step 2: View Wallet Address
Once you have added a network, you will see it reflected in your Accounts page. Tap on a network and you will see its native coin and corresponding value reflected on your Assets page. When you see this, tap on it as well.
 |  |
 |  |
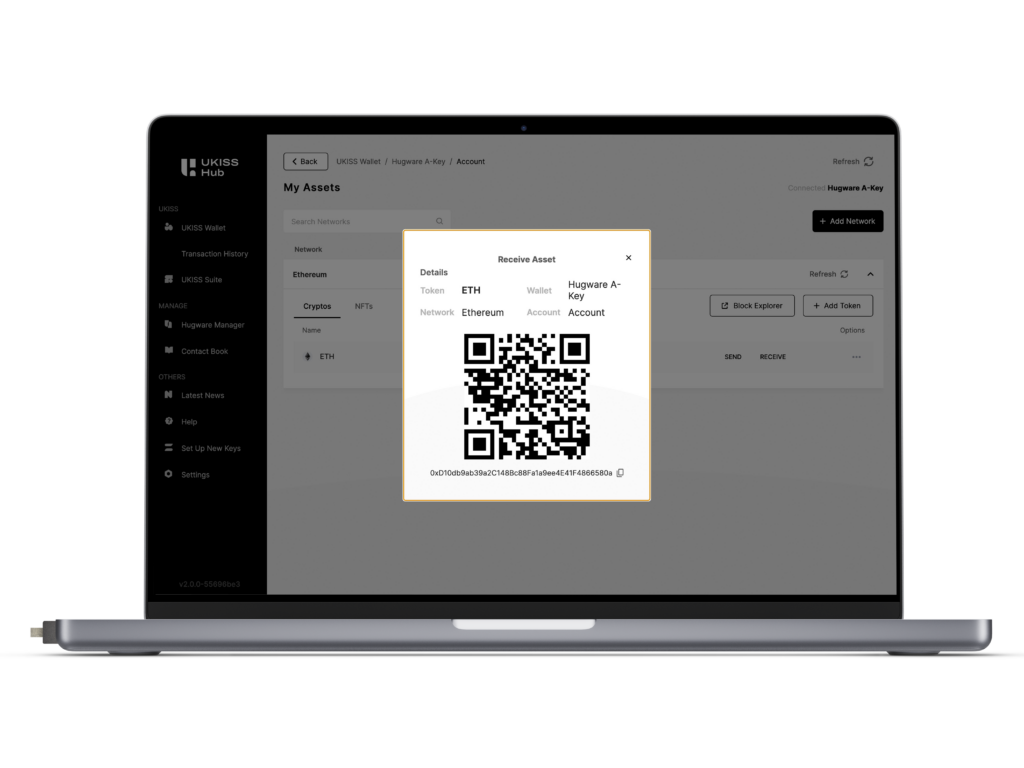 | 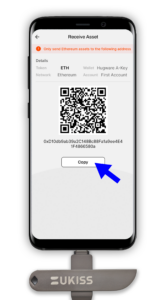 |
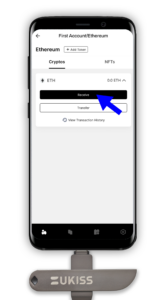
A “Receive” button will appear. Tap or click on it and the app will show your wallet address.
You may scan the QR code of your address or copy and paste it to your external or exchange wallet to complete the deposit of assets to UKISS Wallet.
If you are depositing tokens, such as ERC-20, BEP-20, and TRC-20, you will need to “Add Token” to view your token value on UKISS Wallet. Follow Step 3 onwards to “Add Token.”
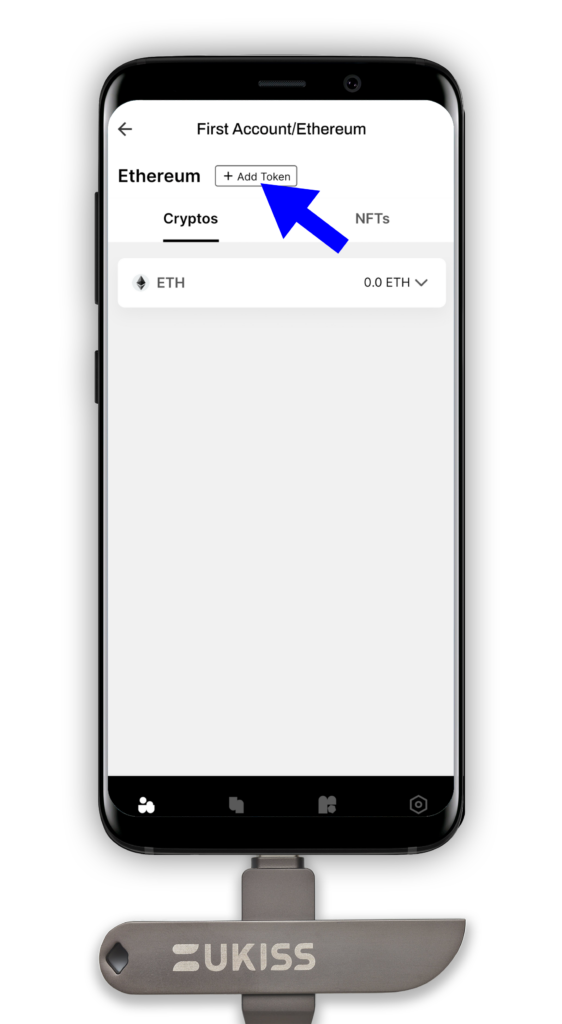
Step 3: Add Token
To add an ERC-20, go to the Ethereum network. If you don’t see the Ethereum network in your Accounts page, go back to Step 1 to add it. Similarly for BEP-20 and TRC-20, you must add BNB Smart Chain and Tron, respectively.
| |
After tapping on the network name, in this case Ethereum, you will arrive at your Assets page. Tap on the “Add Token” button at the top of the page.
|  |
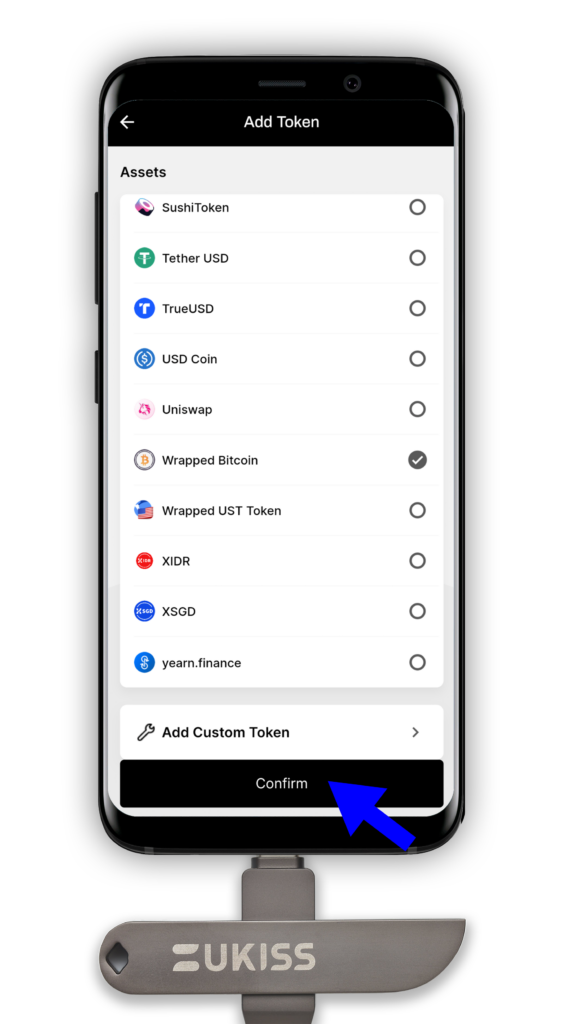
Then, select the ERC-20 token of your asset from the default list provided and tap “Confirm.”
 |  |
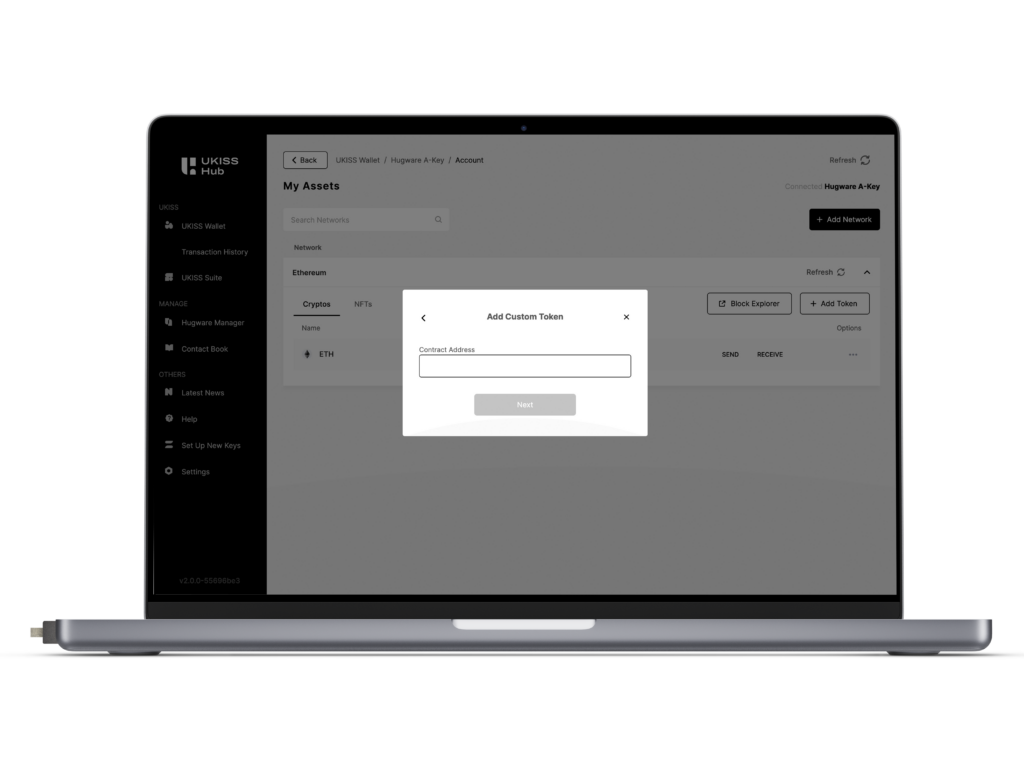
If you don’t see your preferred token, you need to tap on “Add Custom Token” to input the token contract address.
 | 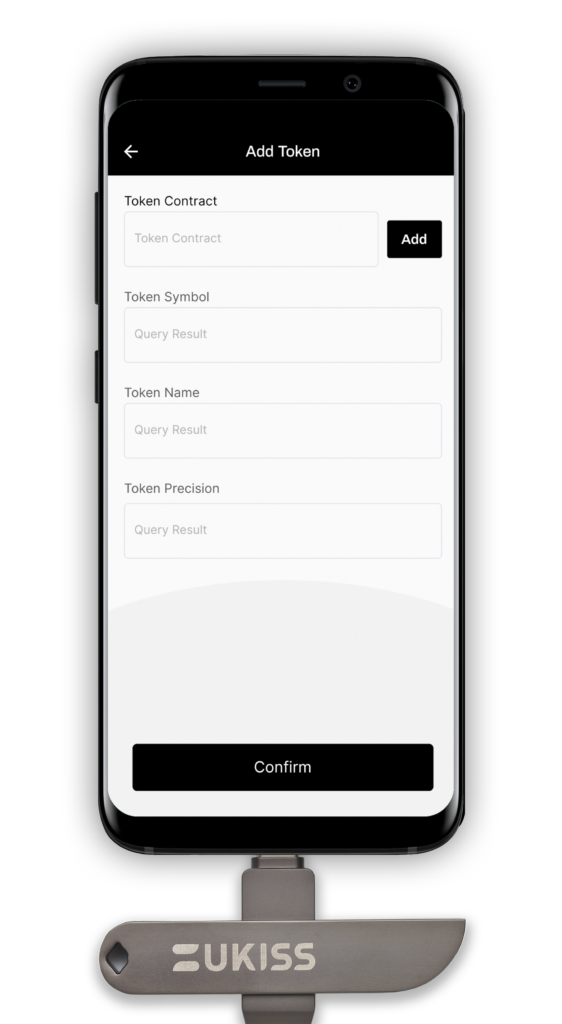 |
When you’re ready, click “Next” or tap “Confirm.”
< 1 hour |
Online process |
Android, macOS & Windows |
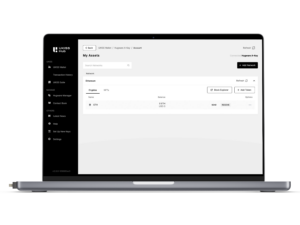
To withdraw or transfer assets out of your UKISS Wallet address, go to your Accounts page and select the appropriate network.
| |
On the Assets page, tap the cryptocurrency you’re transferring.
 | 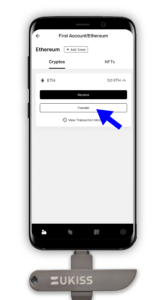 |
Then, click Send on desktop or tap on the “Transfer” button on mobile.
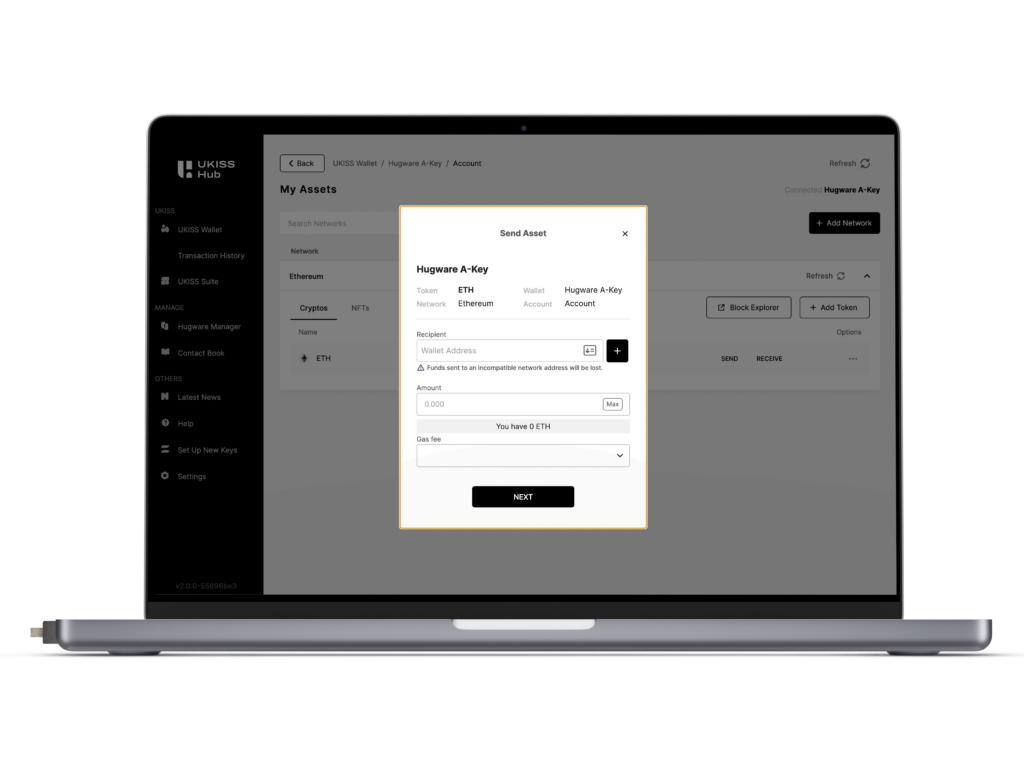 | 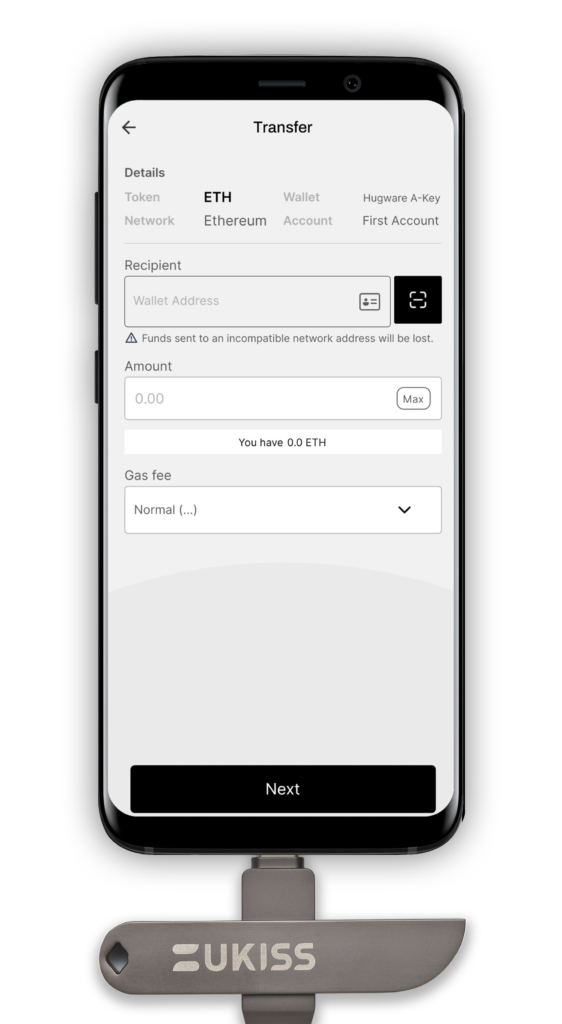 |
Fill in the form and tap “Next.” You will be asked to review your information before submitting the transaction. When you’re ready, tap “Next” again.
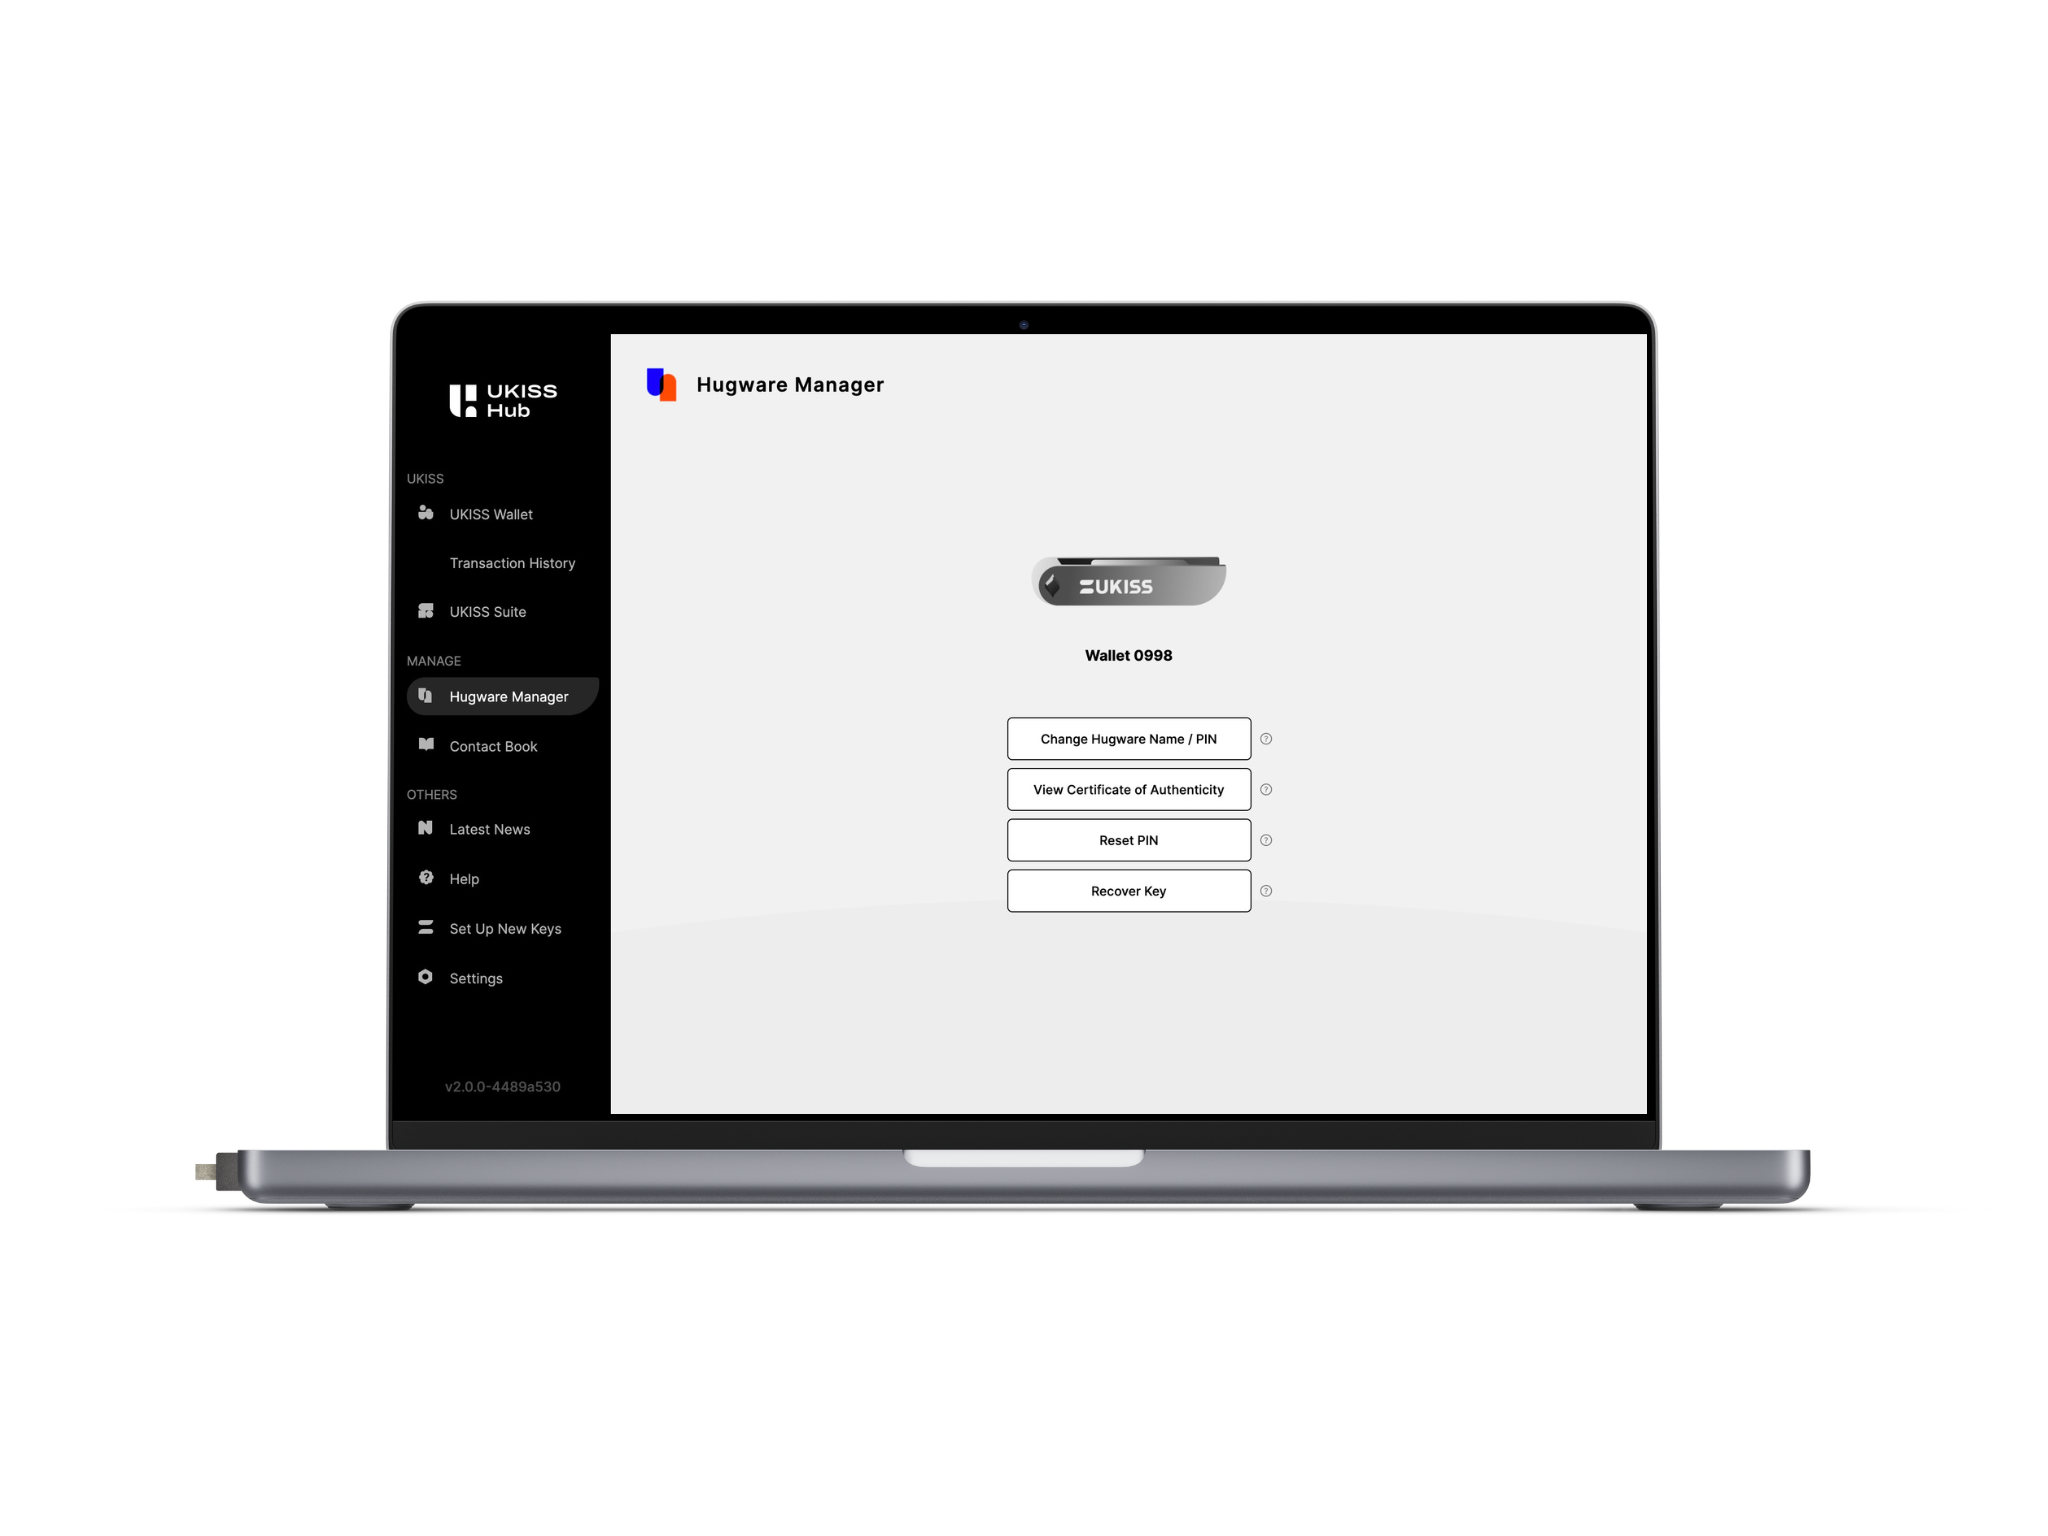
You can change the name and PIN of your Hugware anytime.
Step 1: Connect A-Key or R-Key and go to Hugware Manager.
|
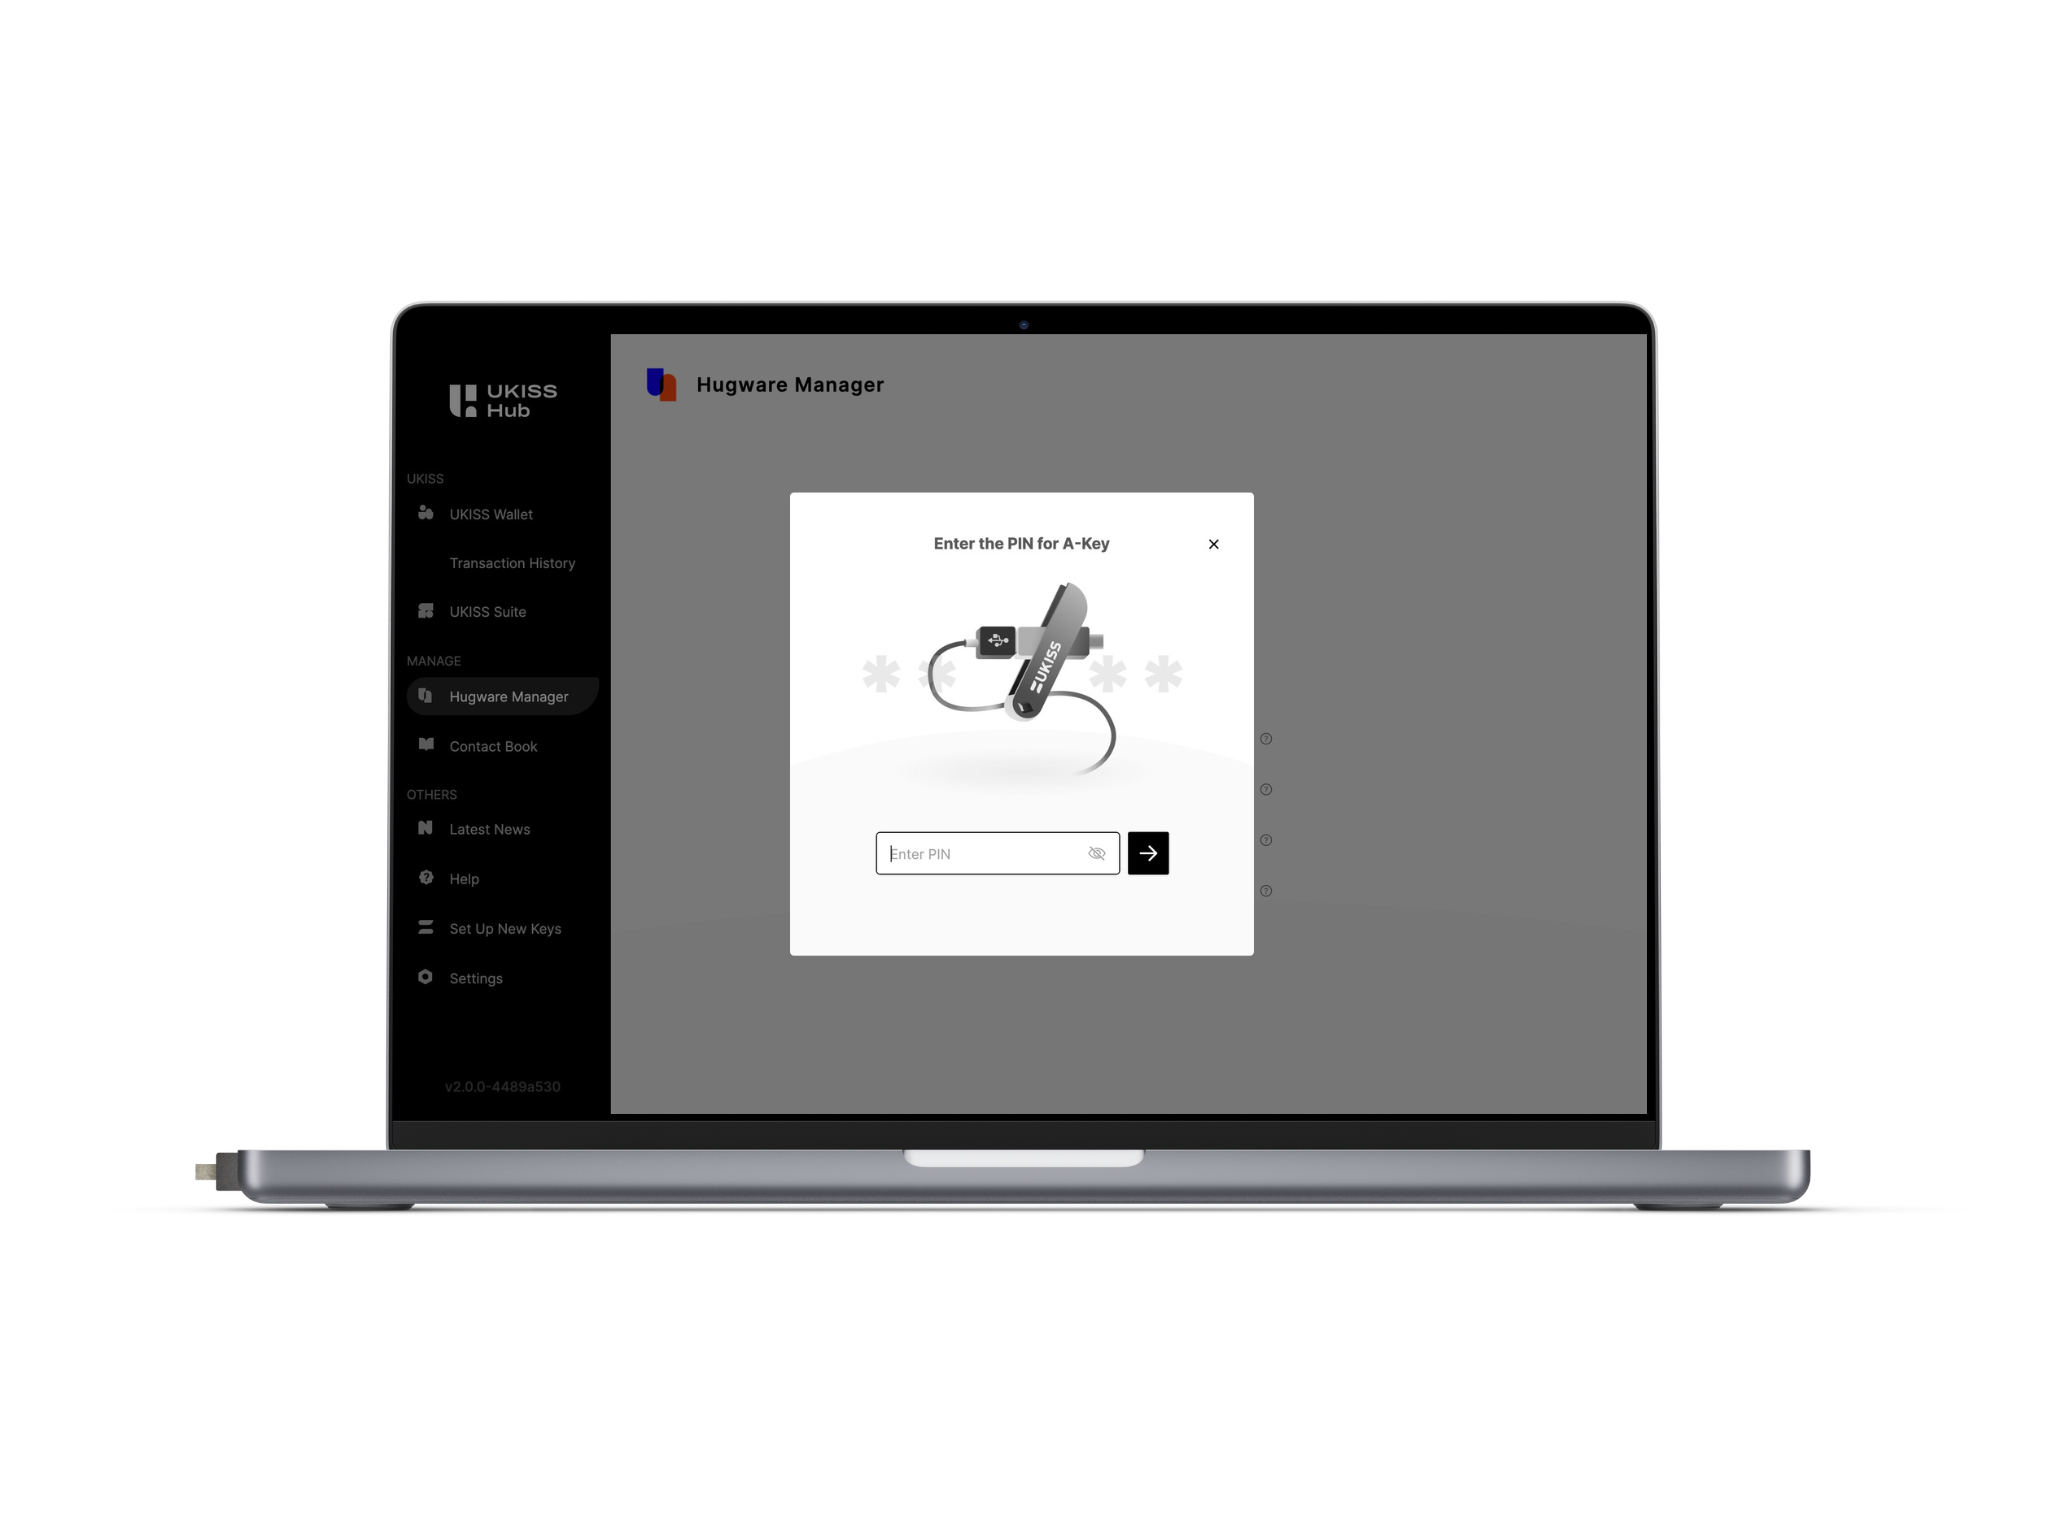
Step 2: Enter the PIN of the connecting Hugware Key.
|
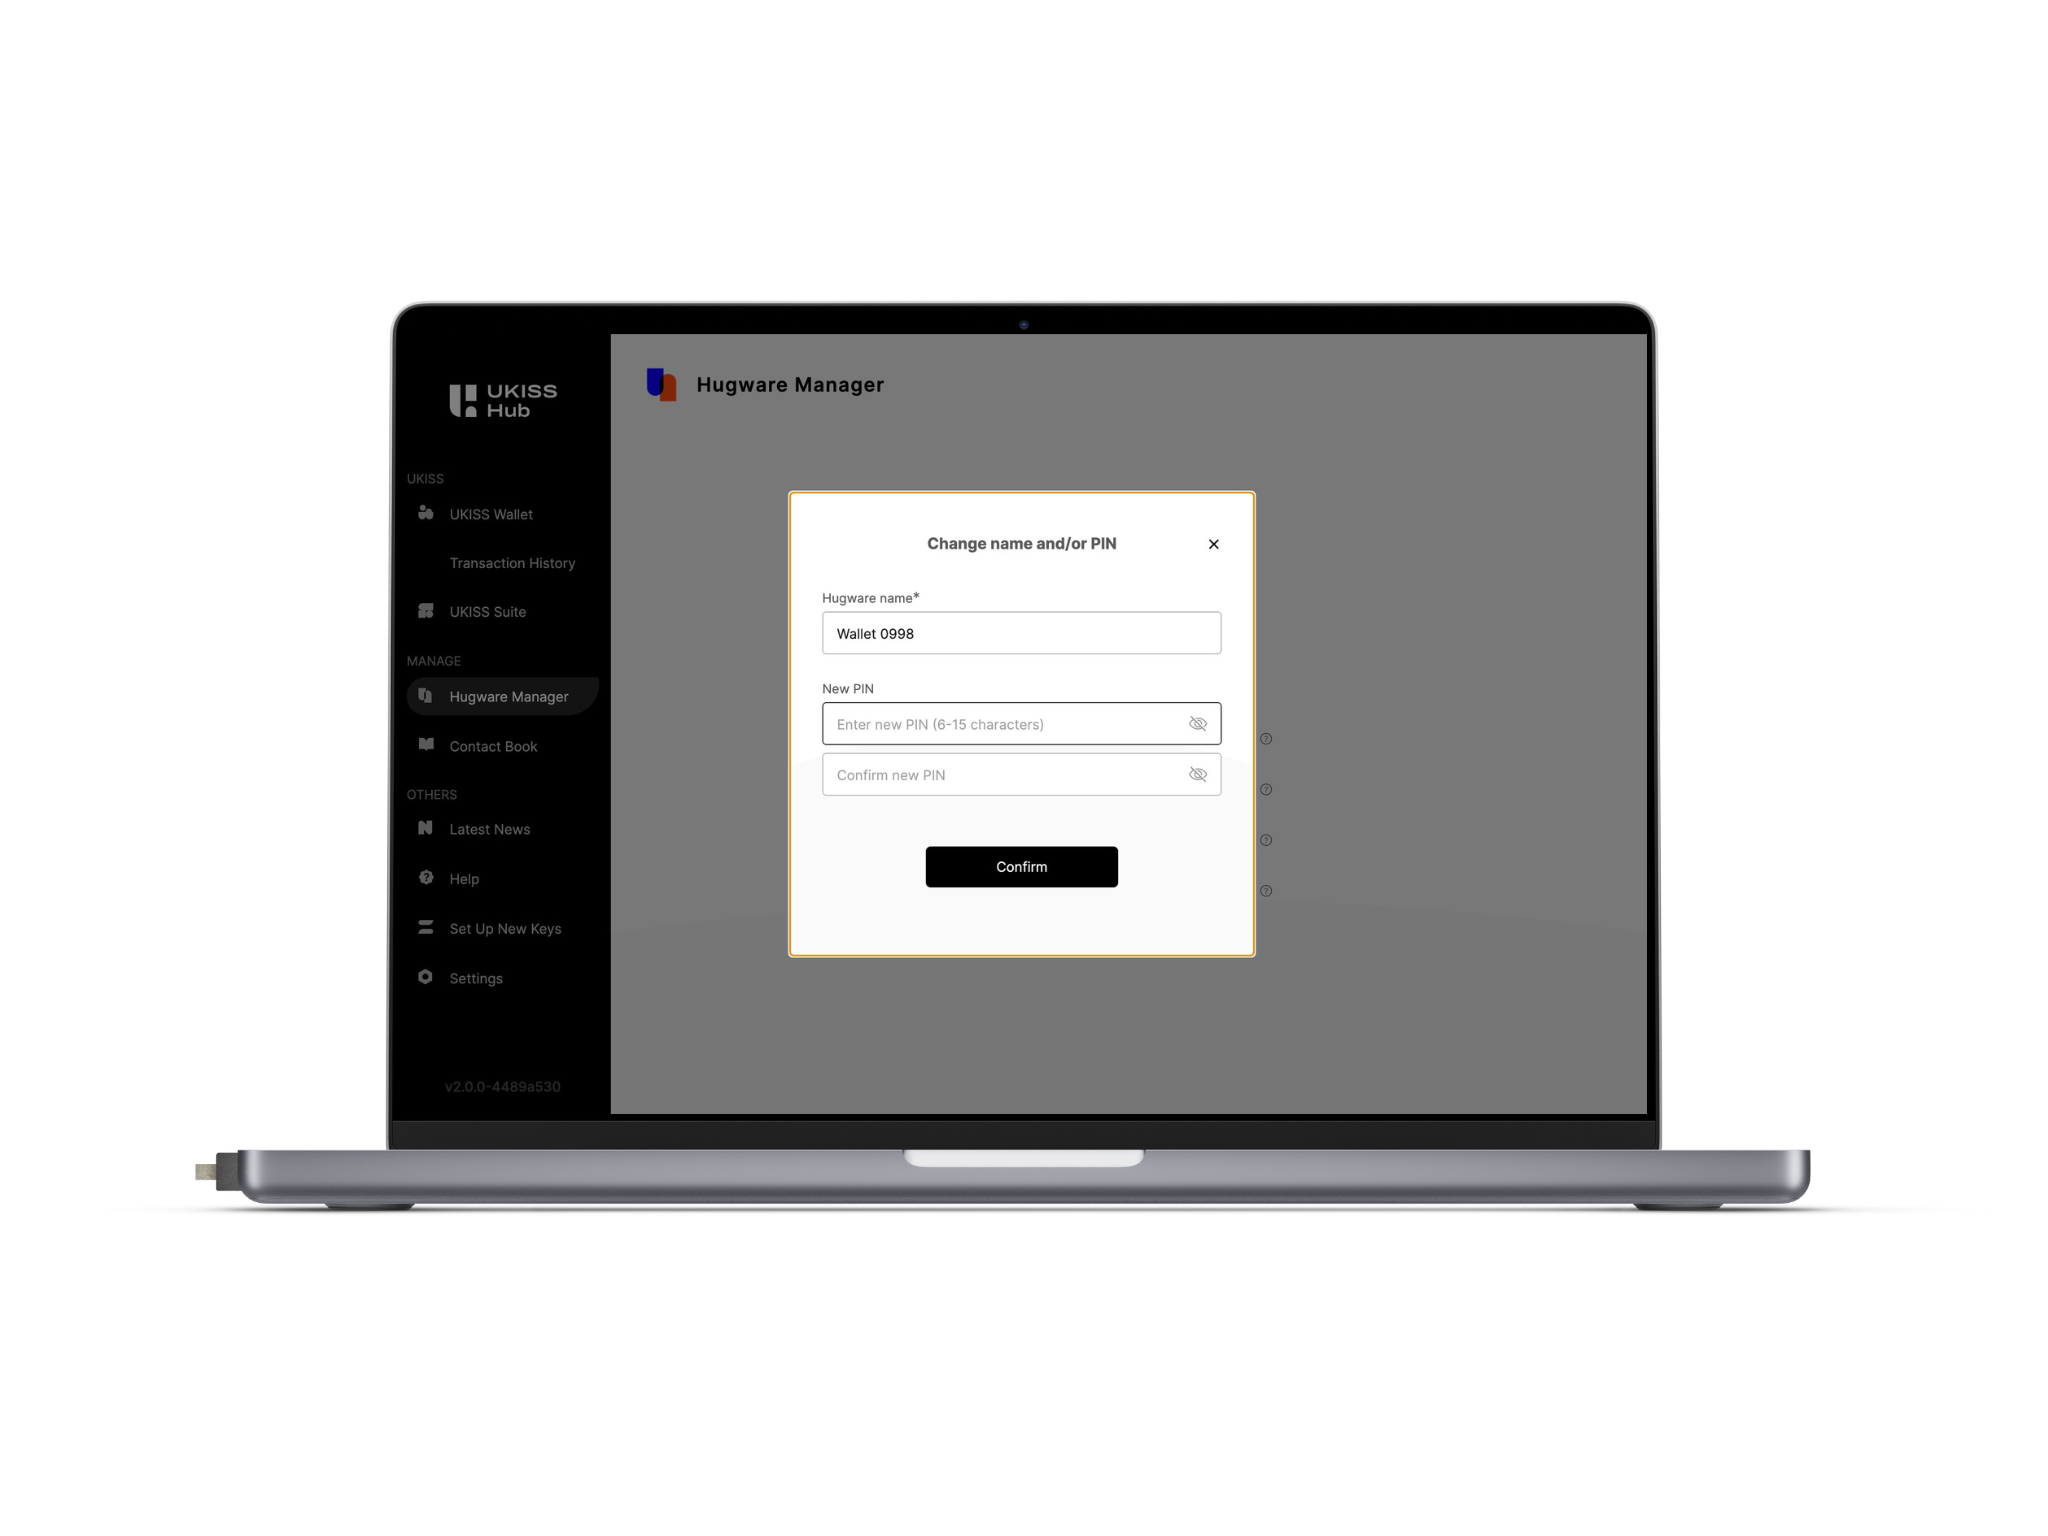
Step 3: Enter a new name and/or PIN of the connecting Hugware Key. Repeat the same PIN in the next space. When you’re done, click Confirm.
|
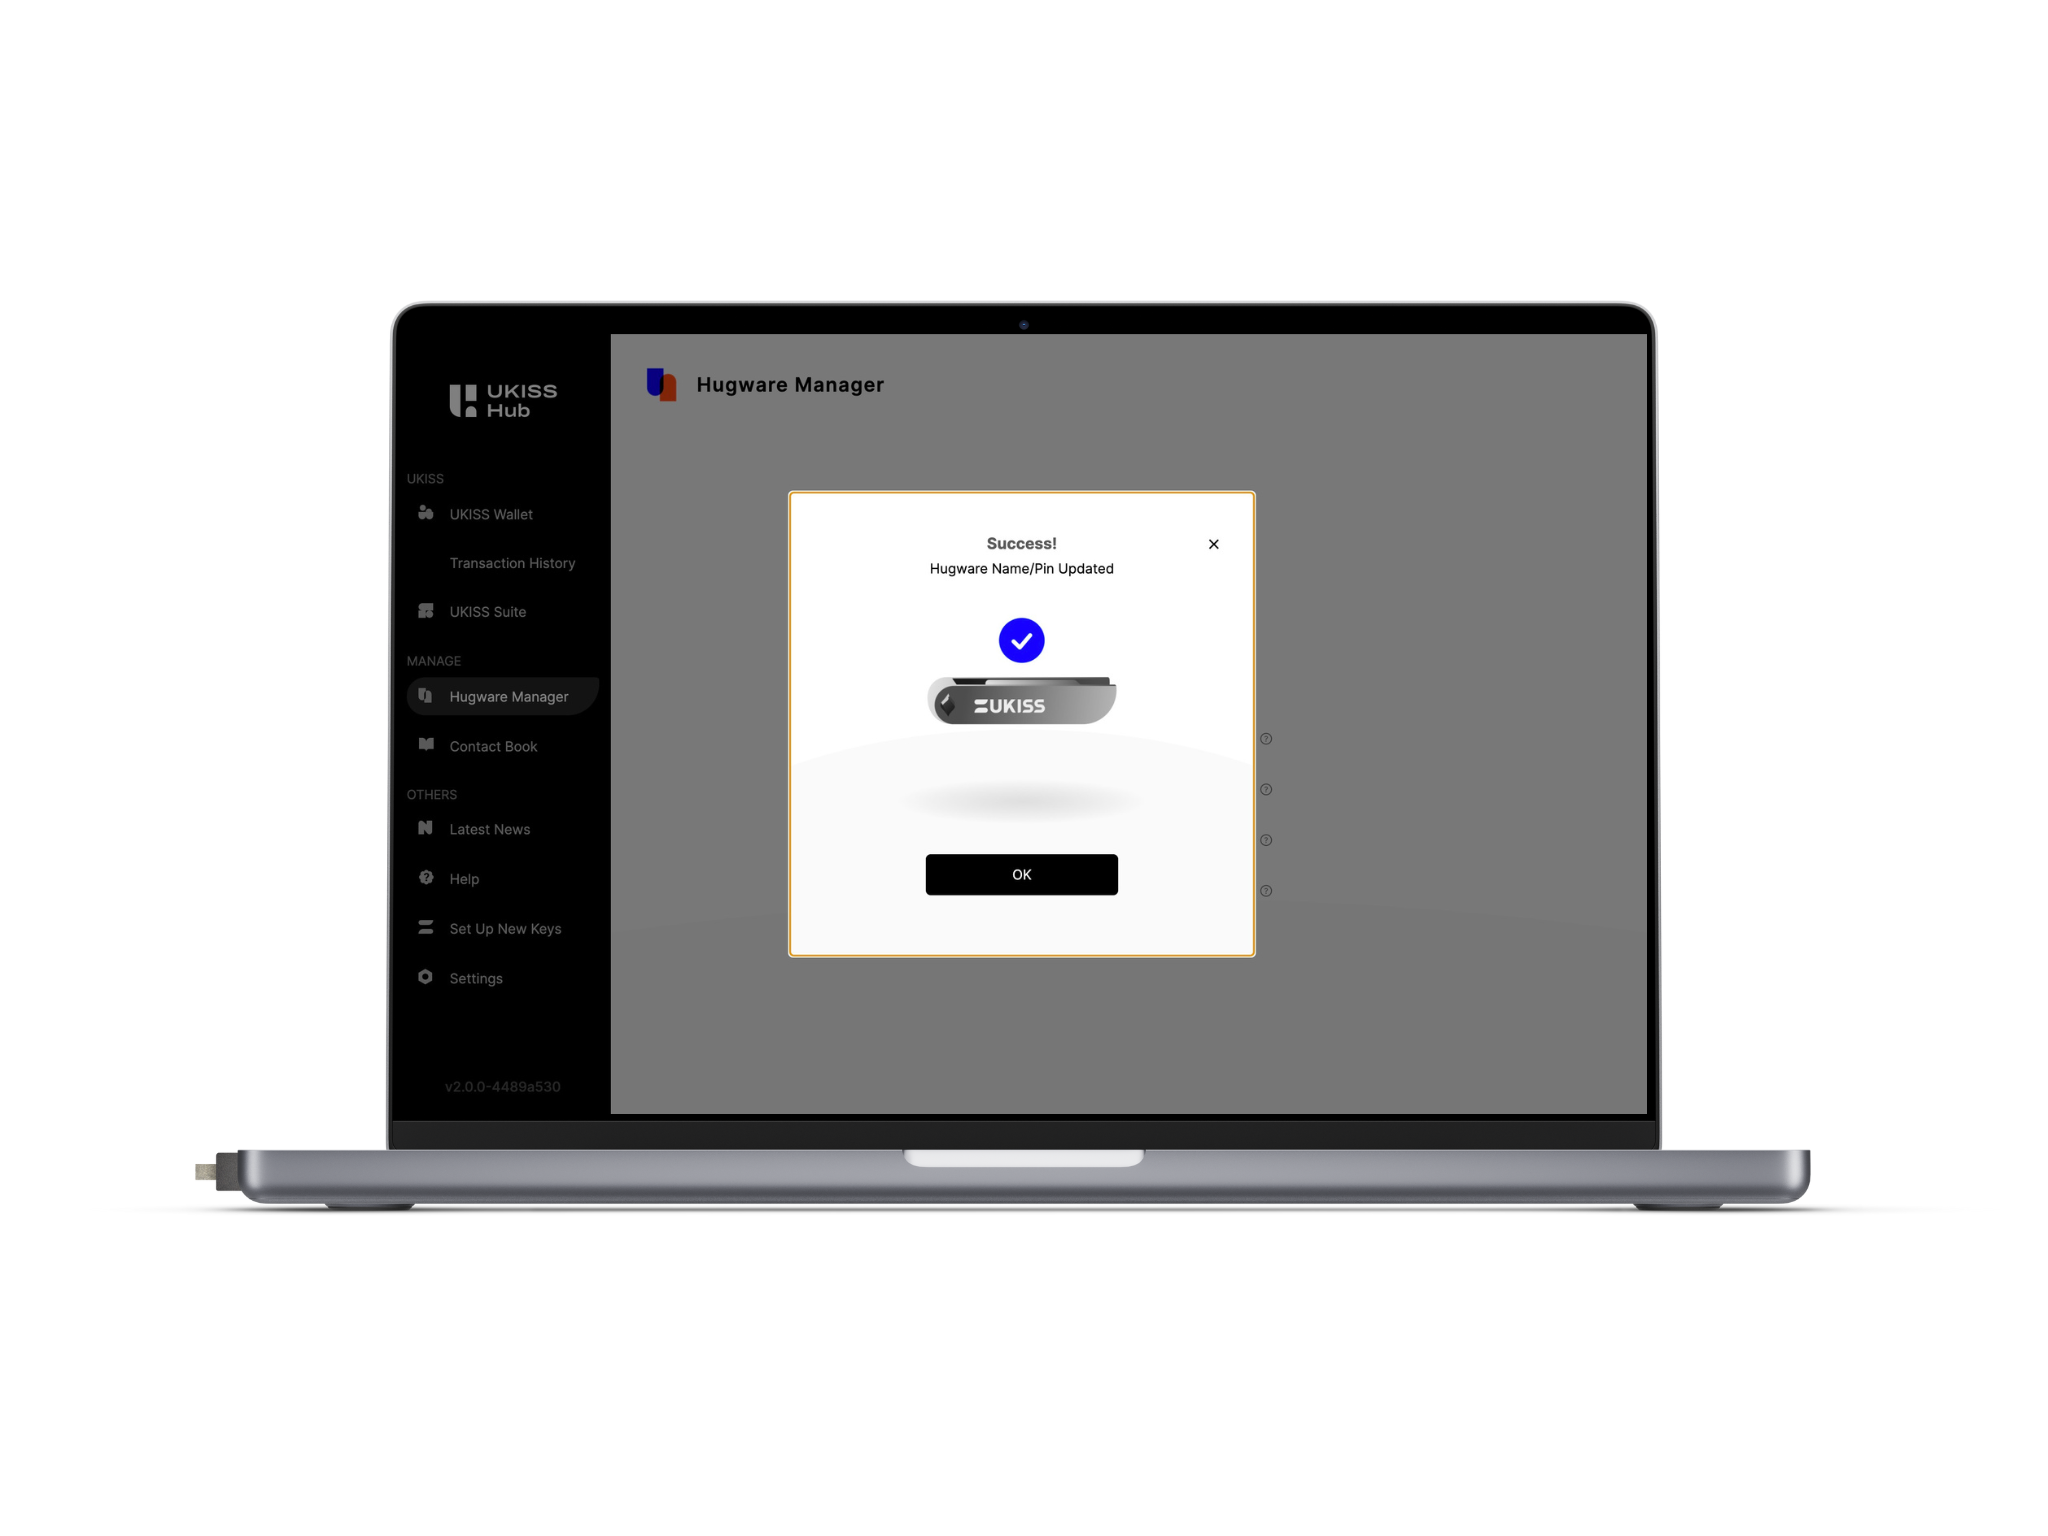
Step 4: Once confirmed, you should see a success page. Click OK.
|
Please repeat the above steps to change the name and/or PIN of other Hugware Keys.